

We offer online training to help you get the most out of your TalentCentral™ platform. These training sessions are free of charge and delivered by our experienced systems training team. Please click here to register.
The TalentCentral™ platform's regional Quick Start Guides are attached to this article.
 TalentCentral - Quick Start Guide AU.pdf
In order to progress a candidate to the Verification stage, the candidate must first have completed the assessment. To check their status, go to your project page and select Manage Candidates. There will be a blue arrow next to the candidate’s name. Click on this to view the task status.
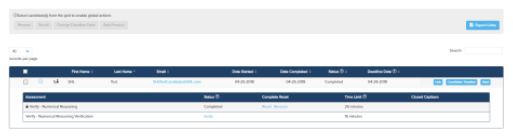
Once the candidate has completed the assessment, they can be invited to the Verification stage by clicking on the words Not Invited under the Status header. The option to Invite the candidate will appear.
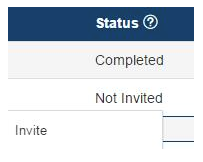
Clicking on Invite will change the status from Not Invited to Not Started.
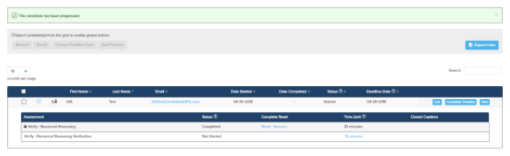
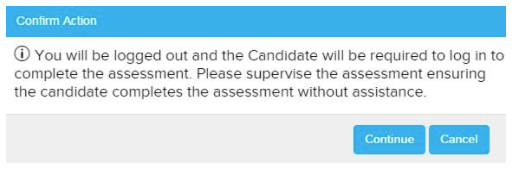
To start the Verification stage, click on Start Proctored or Start Now. You will be logged out of the system, and the candidate will need to log in with their own details to begin the test.
Please note that while you can progress a candidate to the Verification stage in advance, the candidate should be supervised on site when completing the verification assessment.
Once the candidate has completed the assessment, they can be invited to the Verification stage by clicking on the words Not Invited under the Status header. The option to Invite the candidate will appear.
Clicking on Invite will change the status from Not Invited to Not Started.
To start the Verification stage, click on Start Proctored or Start Now. You will be logged out of the system, and the candidate will need to log in with their own details to begin the test.
Please note that while you can progress a candidate to the Verification stage in advance, the candidate should be supervised on site when completing the verification assessment.
If you need to resend an invitation email to a candidate, click on Manage in the menu bar.
Select Candidate.
Search for the candidate's name or email address. Alternatively, use the Project Name filter to narrow down the number of candidates displayed.
On the right hand side under Actions, click on Manage candidate.
Select the candidate you wish to resend the invitation email to from the Manage Candidates menu options, click on Resend.
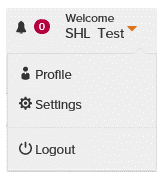
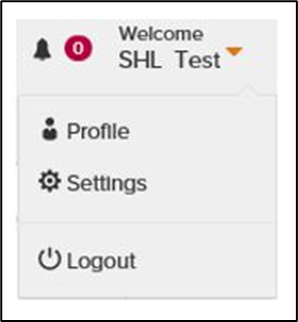
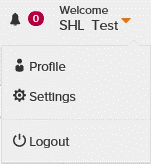
To add new users, click on the Welcome button in the top right corner of the screen and select Settings.
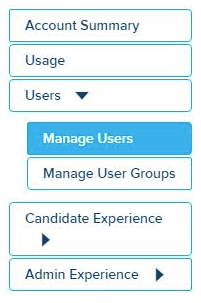
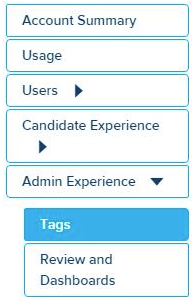
You will now be on the Account Summary page. Click on Users, and then Manage Users.
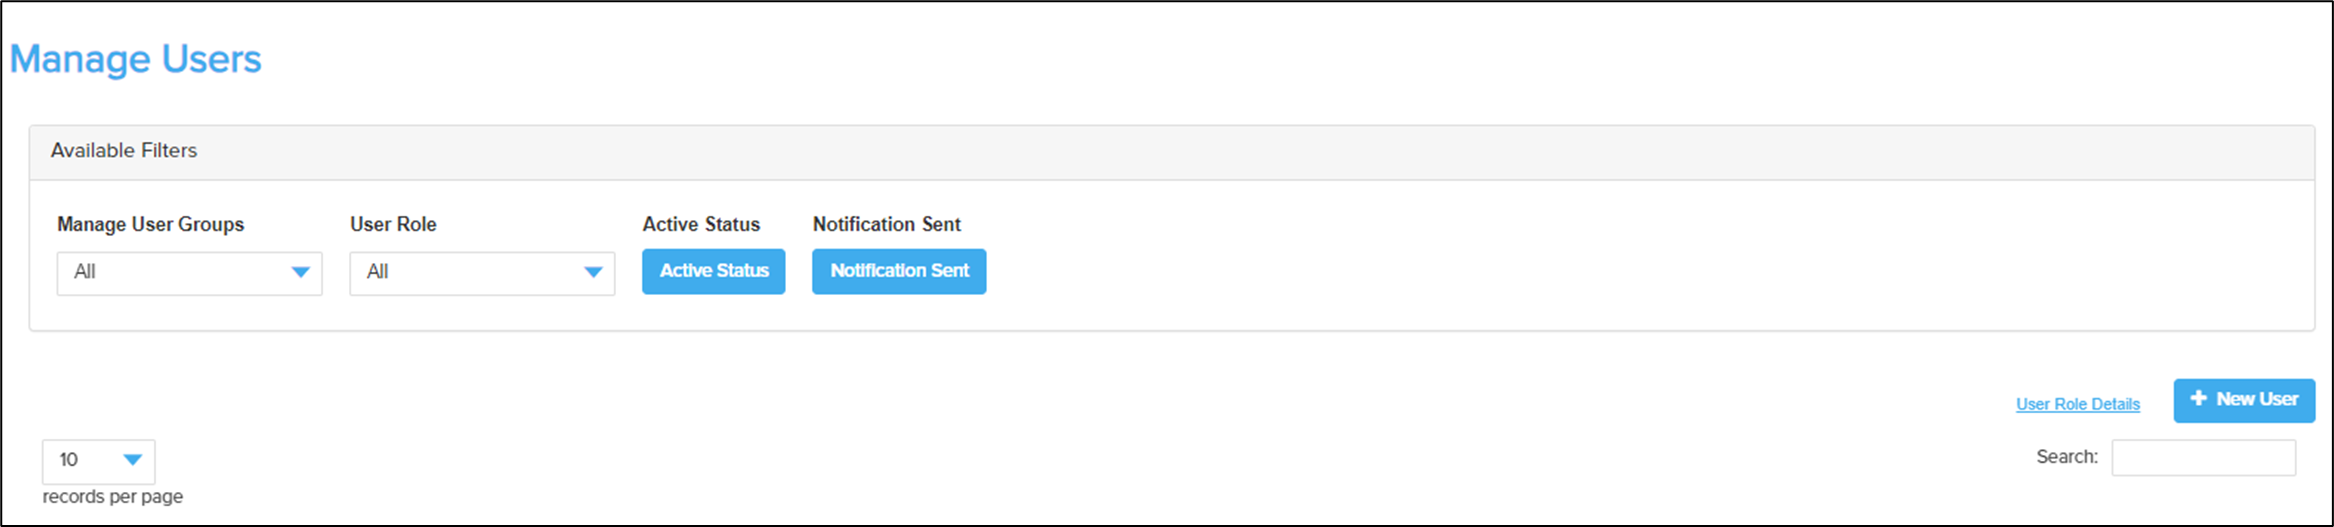
On this page, you will see a list of users who have been added to your system, the option to create new users and the User Role Details. The User Role Details option has information about the user levels available in TalentCentral™ and their permissions.
You will now be on the Account Summary page. Click on Users, and then Manage Users.
On this page, you will see a list of users who have been added to your system, the option to create new users and the User Role Details. The User Role Details option has information about the user levels available in TalentCentral™ and their permissions.
To add a new user, click on +New User and enter the required information, then click on Create. Selecting the box Send email notification will automatically notify the user that they have been created and provide them with a link to log in.
Follow the below steps to send out a test to a known candidate using the TalentCentral™ platform:
From the menu bar at the top of your screen select Create New and click on Project. The Basic Settings* area will be displayed.
Enter the required information. Only fields marked with an asterisk (*) are mandatory. Candidates will not be able to complete their test after the deadline date has passed.
Click on Products*
Choose the Select Manually tab to add individual tests to the project.
There are search filters on the page to help you find a test.
Click on the test name under Search Results to view a description and, if applicable, specify the test level, language and comparison group.
Click on Add to add test to your project. You may be prompted to select related items, if applicable. Click on Done when you have made your choice.
Your Selected Products will be displayed on the right side of the page.
You can repeat this step until all your required products have been added to the project.
When you have finished selecting your products, click on Users*
Click on the name of the User Groups you want to add to the project.
Click on See Users to see who will have access to the project. Learn more about User Groups
You can search for existing users, who are not part of the User Group, on the right side and add them to the project by clicking on +Add when their name appears in the list.
Click on Candidates* to add the individuals you wish to assess.
Although it is possible to add thousands of candidates to the same project, it is not recommended as it can greatly increase the time it takes to carry out simple tasks, e.g. accessing the project, generating reports, etc.
Under Add individual candidates enter your candidate's title, first and last names and their email address.
Select the language you want for the email invitation.
Click on +Add.
Repeat this step until all your candidates have been added to the project.
The following steps are optional. If you wish to proceed without carrying out these steps, please refer to the Final steps section of the article to send out your test links:
Click on Notifications
Under Select the email notification preferences for this project, you can select the following options:
Send notification to the project Creator - if you would like to receive a notification when your candidate completes their assessments
Send notification to all users who are assigned to the project – if you would like all users to receive a notification when your candidate completes their assessment.
For projects that migrated from S2P, the assigned creator of that project is the Impersonate User. If you wish to receive the email as a project administrator you can edit the project in question in the Notification section. The notifications should be set to "send notifications to the project creator" AND "send notification to all users who are assigned to the project." This will allow all users in a user group to receive notification emails.
Under Select preferences for receiving BCC of emails sent to candidates, you can select the following options:
BCC project Creator – if you would like to receive a copy of all emails sent to your candidate
BCC all users who are assigned to the project – if you would like all users to receive a copy of all emails sent to your candidate
BCC the following email address – a new field will appear to the right where you can enter the specific email address and a copy of all emails sent to your candidate will also be sent to that address
Click on Emails
The Email alias selected will be TalentCentral, unless otherwise specified.
In the Assessment Invitation, select your email template from the dropdown. Invitation emails will be sent out when you create the project.
You can also set as many reminders as you would like. In the reminder 1, select your email template from the dropdown. Click on Reminder Date to choose a date on the calendar or click on Days before Project Deadline and enter the number. The latest reminder is the last one that can still be adjusted.
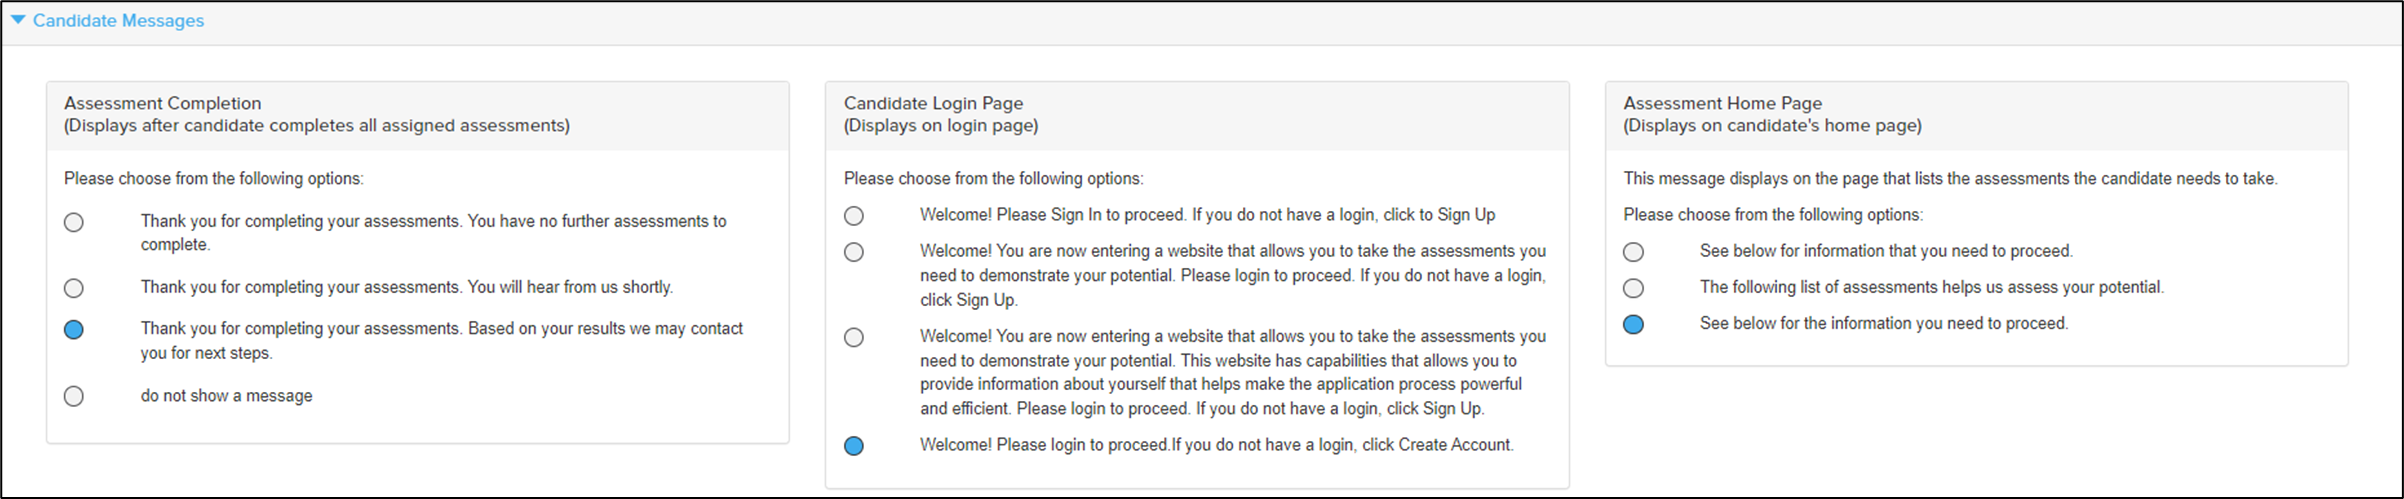
Under the Candidate messages section both standard system messages and messages created by a company super user will be displayed. Select the message you would like to be displayed to candidates at each stage of the assessment experience. To find out more information on how to create candidate messages please go to the What is candidate messaging and how can I use it in TalentCentral™? article.
Final steps
You can review the choices you have made for the whole project by looking at the section headers.
If you need to make changes to any of the sections click on the section header to expand it and make the necessary adjustments.
When you are satisfied that all the information in the project is correct, click on Create Project at the top or bottom of the project set-up page. Once you click on Create Project, the invitation emails are sent out to the named candidates on the project.
Under Add individual candidates enter your candidate's title, first and last names and their email address.
Select the language you want for the email invitation.
Click on +Add.
Repeat this step until all your candidates have been added to the project.
The following steps are optional. If you wish to proceed without carrying out these steps, please refer to the Final steps section of the article to send out your test links:
Click on Notifications
Under Select the email notification preferences for this project, you can select the following options:
Send notification to the project Creator - if you would like to receive a notification when your candidate completes their assessments
Send notification to all users who are assigned to the project – if you would like all users to receive a notification when your candidate completes their assessment.
For projects that migrated from S2P, the assigned creator of that project is the Impersonate User. If you wish to receive the email as a project administrator you can edit the project in question in the Notification section. The notifications should be set to "send notifications to the project creator" AND "send notification to all users who are assigned to the project." This will allow all users in a user group to receive notification emails.
Under Select preferences for receiving BCC of emails sent to candidates, you can select the following options:
BCC project Creator – if you would like to receive a copy of all emails sent to your candidate
BCC all users who are assigned to the project – if you would like all users to receive a copy of all emails sent to your candidate
BCC the following email address – a new field will appear to the right where you can enter the specific email address and a copy of all emails sent to your candidate will also be sent to that address
Click on Emails
The Email alias selected will be TalentCentral, unless otherwise specified.
In the Assessment Invitation, select your email template from the dropdown. Invitation emails will be sent out when you create the project.
You can also set as many reminders as you would like. In the reminder 1, select your email template from the dropdown. Click on Reminder Date to choose a date on the calendar or click on Days before Project Deadline and enter the number. The latest reminder is the last one that can still be adjusted.
Under the Candidate messages section both standard system messages and messages created by a company super user will be displayed. Select the message you would like to be displayed to candidates at each stage of the assessment experience. To find out more information on how to create candidate messages please go to the What is candidate messaging and how can I use it in TalentCentral™? article.
Final steps
You can review the choices you have made for the whole project by looking at the section headers.
If you need to make changes to any of the sections click on the section header to expand it and make the necessary adjustments.
When you are satisfied that all the information in the project is correct, click on Create Project at the top or bottom of the project set-up page. Once you click on Create Project, the invitation emails are sent out to the named candidates on the project.
To use those settings, please log in as a Company Admin or Company Super User.
Creating and editing Email Templates
Creating and editing Email Templates
- Click on your name in the top right corner of the screen
- Select Settings
- Click on Candidate Experience
- Click on Emails
- Under the Email template section, select the relevant email you wish to adjust
- Click on Add Email Template. The Create New Email Template box should appear at the bottom
- Fill in Template Name
- Choose the language (please note that if you wish to create templates in multiple languages, you will have to have the translations of the text ready)
- Enter the Email Subject
- Enter the custom text into the email field below and click on Save. Repeat those steps per language template you wish to customize
- You can then set the new template as a default, which will show up for all projects
- To use the new templates, click on +Create New and select Project. Go to the Emails section and select your template in the Assessment Invitation or Reminder dropdown
- To edit an existing template, click on the Edit button to the right of the email template and adjust the email in the Edit Email Template section. Click on Save
Creating Email Aliases
- In the Settings menu, click on Emails.
- Under Email Name Aliases, click on +Add Alias.
- In the pop-up window, enter the name and click on Save. You will then see the new Name Alias under the Name Aliases. You can select your default Alias for all projects created on the system.
- If you would like the managers to be able to use this feature, please tick Allow free text entry when creating project.
Updating Email Settings
You can choose which project update and candidate notifications you would like to use as default for all projects created on the system. You can choose any of the following options:
- Send notification to the project Creator
- Send notification to all users who are assigned to the project
- BCC project Creator
- BCC all users who are assigned to the project
- BCC the following email address
- When you then create a new project, you will then see those options ticked as default
You can manually invite your candidates to complete the remaining assessments by clicking on View Project Results on the project page and clicking the arrow next to the candidate. Click on Progress to activate the next stage.
Accessing candidates' results on the TalentCentral™ platform is quick and easy.
If you have marked your project as a favorite:
If you have marked your project as a favorite:
- Go to your Homepage
- Locate the project under Favorite Projects
- Click on the View Results option in the bottom left corner
- This will bring up all the candidates associated with the project including their results
- Click on the arrow symbol to access an HTML version of your report that will open in your browser Alternatively, click on the Download button to save a copy of the report on your computer
If you haven't marked your project as a favorite:
- Click on Review from the main menu bar
- Click on Candidates
- Search for your candidate or narrow down the number of candidates displayed by using the filters
- Click on Project Results on the right hand side
- This will bring up all the candidates associated with the project including their results
- Click on the arrow symbol to access an HTML version of your report that will open in your browser. Alternatively, click on the Download button to save a copy of the report on your computer
For more information on setting up projects, please download the Quick Start Guide here.
You can manage and edit projects either from the menu bar or directly from any favourite projects that have been saved to your homepage.
Locating and Managing Existing Projects
To edit and/or add information to an existing project which is not listed as a favourite:
You can manage and edit projects either from the menu bar or directly from any favourite projects that have been saved to your homepage.
Locating and Managing Existing Projects
To edit and/or add information to an existing project which is not listed as a favourite:
- Select Manage from the menu bar on the top of the page.
- Then select Project from the drop down:
<
- Locate your project from the list available or use the filters to search for a specific project.
- Click on the project name to select your project.
After a project has been published, you can:
- Edit products.
- Add additional users to the project.
- Add or manage candidates.
- Edit notifications, invitations and emails.
Adding Additional Products to Existing Project:
When you have located the existing project under the Manage section, and clicked on the project name, you will see the following overview:
- Click on the tab named “Products”
- When menu opens, click on the option “Select Manually”
- Search for the required assessment or report in this field and select when located
- Ensure you select the correct language and click on “Add”
- The system will now ask you to confirm, if you wish to add the report as a Core or Additional Product.
For most projects, the assessments and reports should be added as Core items so that they are available automatically. In some cases, you may wish to add additional assessments or reports for some of your candidates.
When you are creating the project, adding an assessment or report as an Additional item will mean that it is not immediately accessible, but can be activated later for the candidates that you choose. Any reports added after the project deadline has passed will automatically be added as Additional items as well.
Select the option that you wish to use (Core or Additional). You will now see the product on the right side of your screen, under the products tab.
Click on “Update Project” and wait till site has confirmed it’s updated.
The selected assessment/report has now been added.
Activating additional assessments and reports
In the screenshot below, the OPQ Universal Competency Report has been added as an additional item, as well as the verification tests for the Verify tests on the project.
To activate an Additional assessment or report, go to the project through the Manage > Projects menu option, open the project, and expand the Manage Candidates section.
Then locate the candidate for whom you want to activate the additional content and click on the blue arrow in a circle to the left of their name.
This will show the list of the candidate’s assessments and reports. Any additional items will show an Invite link next to the task. Clicking on the link will activate it.
If this is for an additional assessment, the candidate will then be emailed to let them know the assessment is available to them. If this is for a report where the candidate has already completed all their tasks, no email will be sent to them.
- Create a project as you normally would, entering all the required fields. How do I create a project and send out a test using the TalentCentral™ platform?
- In the Emails section, go to the Create New Email Template section.
- Fill in Template Name
- Choose the language (please note that if you wish to create templates in multiple languages, you will have to have the translations of the text ready)
- Enter the Email Subject
- Enter the custom text into the email field below and click on Save. Repeat those steps per language template you wish to customize.
- Once the template is created, select the template name in the Assessment Invitation dropdown.
- To preview the Email Template, click on the eye symbol to the right of the Assessment Invitation field. Click on Static Template Body to view the standard text candidates will receive, which includes the assessment information and support links. As the TalentCentral™ platform will auto-populate this template into the invitation email it cannot be modified. Click on Cancel once you finish previewing the Email Template.
- The invitation email will be sent once you finish creating the project and click on Create Project.
There is a feature in TalentCentral called Duplicate (or Duplication) Application Check. If it hasn’t been already, this will need to be turned on by SHL before a candidate can be tested again in the same project. Our Technical Support teams can help you request this. You can get in touch with your local Technical Support team by using the Contact Form widget on the right side of this page.
Once it has been turned on you will be able to add the candidate to the project again using their name and email address to create a new test link. Multiple Use links cannot be used to retest a candidate within the same project, which is why the candidate must be added to the project again individually.
When you click on Update Project you will get a message asking if you are sure you want to add the candidate again, which you will need to agree to. The candidate will need to use their existing credentials to log in.
There are two ways to set up a deadline date when creating a project. You can choose your preferred deadline date or you can set the days for completion after the candidate first registers on the system. Both can be done at project-level or candidate-level.
Changing your chosen deadline date
Project-Level
Go to Basic Settings* and click on the current Deadline Date to change it, then click on Update Project. This will change the deadline date for all candidates on the project.
Candidate-Level
Go to Manage Candidates* and click on the current Deadline Date to change it. You should get a green pop-up to tell you that the date has been updated and the candidate notified. This will only change the deadline date for the candidate you selected. If you want to change the date for multiple candidates, click on the box next to each candidate then the Change Deadline Date button above to update all of the deadlines at the same time.
Changing the days for completion
Project-Level
Go to Basic Settings* and click on the current Days for Completion*, which will bring up a pop-up box where you can change the number of days. Click on the tick (check) to save the new number of days then click on Update Project. This will change the days for completion for all candidates on the project.
Candidate-Level
Go to Manage Candidates* and click on the current Deadline Date to change it. You should get a green pop-up to tell you that the date has been updated and the candidate notified. This will only change the deadline date for the candidate you selected. If you want to change the date for multiple candidates, click on the box next to each candidate then the Change Deadline Date button above to update all of the deadlines at the same time.
Supported Browsers
- Google Chrome Version 100 and higher (Windows, Mac)
- Mozilla Firefox Version 100 and higher (Windows, Mac)
- Safari Version 11 and higher (Windows, Mac)
- Microsoft Edge Version 100 and higher (Windows)
Supported display applets
- Active Scripting (or JavaScript)
- ActiveX Controls and Plug-ins
- Java Runtime Environment (virtual machine)
Some test types require specific browsers:
- Tests with audio work with all supported browsers
- Non-simulation tests work with all supported browsers
- Video Interview requires Google Chrome version 100+, Edge 100+, Safari 11+ and Mozilla 100+. Wireless earphones/microphone should not be used for the interview
Screen Resolution
- Recommended width x height
- Modern laptop (Windows) : 1366 x 768
- Macbook : 1200 x 800
- Desktop : 1366 x 768 or higher
*If the width of your screen is less than 768 pixels, the website will adapt to a tablet view
*If the width of your screen is less than 480 pixels, the website will adapt to a mobile view
*Zoom Level: For optimal experience you should set the value at 100%
Browser Security Settings
- Recommended: Medium default-level security
Please follow the below steps if your company does not allow a medium default security level and you plan to administer tests that require the Authorware simulation player
1) Click on Tools (or press ALT+T)
2) Click on Internet Options
3) Click on the Custom level… button
4) Download signed ActiveX controls, Run ActiveX controls and plug-ins and Script ActiveX controls marked safe for scripting* should be set to Enable.
Browser and Session Cookies
1) Click on Tools (or press ALT+T)
2) Click on Internet Options
3) Click on the Custom level… button
4) Download signed ActiveX controls, Run ActiveX controls and plug-ins and Script ActiveX controls marked safe for scripting* should be set to Enable.
Browser and Session Cookies
- Recommended: Enabled
Firefox
1) Click on Tools (if you do not see the menu bar, press and release the ALT key)
2) Click on Options
3) Click on the Privacy tab
4) Under the History section, select Use Custom Settings for History from the drop-down menu
5) Make sure the box Accept Cookies From Sites is selected
Browser Temporary Internet Files Settings
- Recommended: Disk space to use: 120 or greater
SHL Microsoft Teams app is SHL’s recruiter/admin application available right from Microsoft Teams. It can be found within the Microsoft Teams App Store and can be used by TalentCentral users.
- SHL MS Teams App can be used to perform frequent recruitment activities (check scores/reports, schedule interviews) directly through MS Teams.
- Serve as a personal assistant to recruiter and hiring managers by sending crucial notifications/reminders of candidates' progress and hiring team’s tasks.
Use SHL Microsoft Teams app to:
- Get your daily activities done faster and more efficiently and reduce time to hire.
- Promote collaborative hiring and eliminate communication delays.
For instructions regarding installation, set up and features of MS Teams app, download the user guide below.
On the TalentCentral™ platform creating a project is the end-to-end process of setting up a test, adding candidates and sending out invitations.
You will require administrator user login details to create a project. If you do not have login details, please contact your company administrator for assistance.
Follow the below steps to create a project using the TalentCentral™ platform:
Log in to your TalentCentral™ account using your email address as the username and the password will be the one you created when registering on the system. If you cannot remember your password use the Forgot password link.
The Homepage is the first page you will see when logging in.
From the menu bar at the top of your screen select Create New and click on Project.

The Basic Settings* area will be displayed. Only fields marked with an asterisk (*) are mandatory.
Click on Products* where you will have two tabs to choose from:
If you wish to use a previously created Assessment Profile, click on the circle next to the name of the Assessment Profile. If you do not see this displayed on the first page you can use the Search field to look it up. Click on the arrow symbol to see which tests have been chosen for each Assessment Profile. Your Selected Assessment Profile will be displayed on the right side of the page. What is an Assessment Profile and how can I set one up? (TalentCentral™)
Alternatively, you can choose the Select Manually tab to add individual tests to the project. There are search filters on the page to help you find a test. Click on the test name under Search Results to display further information about the test and, if applicable, specify the test level, language and comparison group. Click on Add to assign a test to your project. You may be prompted to select related items, if applicable. Click on Done when you have made your choice. Your Selected Products will be displayed on the right side of the page. Repeat this step until all your required products have been added to the project.
When you have finished selecting your products, click on Users*.
Click on the name of the User Groups you want to add to the project. If you are only assigned to one User Group it will automatically be selected.
Click on See Users to see who will have access to the project. What is a User Group and how can I create one? (TalentCentral™)
You can Search for individual users, who are not part of the User Group, on the right side of the page and add them to the project by clicking on +Add when their name appears in the list.
Click on Candidates* where you will be given four options for adding the individuals you wish to assess.
Under Add individual candidates enter your candidate's title, first and last names and their email address.
Select the language you want for the email invitation.
Click on +Add.
Repeat this step until all your candidates have been added to the project.
If you would prefer to upload all your candidates in one go, all you need are the candidates' first and last names and their email addresses and then you can use our Bulk Import feature. How do I use the Bulk Import feature on the TalentCentral™ platform?
If you do not yet have the names of your candidates, you can generate a number of test links at the set-up stage by clicking on Add individual unknown candidates and entering the number of links you need.
If you want candidates to be able to self-register for an assessment, you can create a project and enable the Multiple Use Link option in the Candidate section. Click on Enable Multiple Use Link and enter the number of candidates you want to allow to register. This is useful if you want to advertise a job opening on your company website. What is a Multiple Use link and how do I create one? (TalentCentral™)
You can choose any of the above ways to add candidates to your project or you can combine them within the same project.
The following steps are optional. If you wish to proceed without carrying out these steps, please refer to the Final steps section of the article to send out your test links:
Click on Notifications
Under Select the email notification preferences for this project, you can select the following options:
Send notification to the project Creator - if you would like to receive a notification when your candidate completes their assessments
Send notification to all users who are assigned to the project – if you would like all users to receive a notification when your candidate completes their assessment
Under Select preferences for receiving BCC of emails sent to candidates, you can select the following options:
BCC project Creator – if you would like to receive a copy of all emails sent to your candidate
BCC all users who are assigned to the project – if you would like all users to receive a copy of all emails sent to your candidate
BCC the following email address – a new field will appear to the right where you can enter the specific email address and a copy of all emails sent to your candidate will also be sent to that address
Click on Emails
The Email alias selected will be TalentCentral, unless otherwise specified.
In the Assessment Invitation, select your email template from the dropdown. Invitation emails will be sent out when you create the project.
You can also set as many reminders as you would like. In the reminder 1, select your email template from the dropdown. Click on Reminder Date to choose a date on the calendar or click on Days before Project Deadline and enter the number. The latest reminder is the last one that can still be adjusted.
Final steps
You can review the choices you have made for the whole project by looking at the section headers. If you need to make changes to any of the sections, click on the section header to expand it and make the necessary adjustments.
When you are satisfied that all the information in the project is correct, click on Create Project at the top or bottom of the project set-up page. Once you click on Create Project, the invitation emails are sent out to the named candidates on the project.
You will require administrator user login details to create a project. If you do not have login details, please contact your company administrator for assistance.
Follow the below steps to create a project using the TalentCentral™ platform:
Log in to your TalentCentral™ account using your email address as the username and the password will be the one you created when registering on the system. If you cannot remember your password use the Forgot password link.
The Homepage is the first page you will see when logging in.
From the menu bar at the top of your screen select Create New and click on Project.
The Basic Settings* area will be displayed. Only fields marked with an asterisk (*) are mandatory.
Click on Products* where you will have two tabs to choose from:
If you wish to use a previously created Assessment Profile, click on the circle next to the name of the Assessment Profile. If you do not see this displayed on the first page you can use the Search field to look it up. Click on the arrow symbol to see which tests have been chosen for each Assessment Profile. Your Selected Assessment Profile will be displayed on the right side of the page. What is an Assessment Profile and how can I set one up? (TalentCentral™)
Alternatively, you can choose the Select Manually tab to add individual tests to the project. There are search filters on the page to help you find a test. Click on the test name under Search Results to display further information about the test and, if applicable, specify the test level, language and comparison group. Click on Add to assign a test to your project. You may be prompted to select related items, if applicable. Click on Done when you have made your choice. Your Selected Products will be displayed on the right side of the page. Repeat this step until all your required products have been added to the project.
When you have finished selecting your products, click on Users*.
Click on the name of the User Groups you want to add to the project. If you are only assigned to one User Group it will automatically be selected.
Click on See Users to see who will have access to the project. What is a User Group and how can I create one? (TalentCentral™)
You can Search for individual users, who are not part of the User Group, on the right side of the page and add them to the project by clicking on +Add when their name appears in the list.
Click on Candidates* where you will be given four options for adding the individuals you wish to assess.
Under Add individual candidates enter your candidate's title, first and last names and their email address.
Select the language you want for the email invitation.
Click on +Add.
Repeat this step until all your candidates have been added to the project.
If you would prefer to upload all your candidates in one go, all you need are the candidates' first and last names and their email addresses and then you can use our Bulk Import feature. How do I use the Bulk Import feature on the TalentCentral™ platform?
If you do not yet have the names of your candidates, you can generate a number of test links at the set-up stage by clicking on Add individual unknown candidates and entering the number of links you need.
If you want candidates to be able to self-register for an assessment, you can create a project and enable the Multiple Use Link option in the Candidate section. Click on Enable Multiple Use Link and enter the number of candidates you want to allow to register. This is useful if you want to advertise a job opening on your company website. What is a Multiple Use link and how do I create one? (TalentCentral™)
You can choose any of the above ways to add candidates to your project or you can combine them within the same project.
The following steps are optional. If you wish to proceed without carrying out these steps, please refer to the Final steps section of the article to send out your test links:
Click on Notifications
Under Select the email notification preferences for this project, you can select the following options:
Send notification to the project Creator - if you would like to receive a notification when your candidate completes their assessments
Send notification to all users who are assigned to the project – if you would like all users to receive a notification when your candidate completes their assessment
Under Select preferences for receiving BCC of emails sent to candidates, you can select the following options:
BCC project Creator – if you would like to receive a copy of all emails sent to your candidate
BCC all users who are assigned to the project – if you would like all users to receive a copy of all emails sent to your candidate
BCC the following email address – a new field will appear to the right where you can enter the specific email address and a copy of all emails sent to your candidate will also be sent to that address
Click on Emails
The Email alias selected will be TalentCentral, unless otherwise specified.
In the Assessment Invitation, select your email template from the dropdown. Invitation emails will be sent out when you create the project.
You can also set as many reminders as you would like. In the reminder 1, select your email template from the dropdown. Click on Reminder Date to choose a date on the calendar or click on Days before Project Deadline and enter the number. The latest reminder is the last one that can still be adjusted.
Final steps
You can review the choices you have made for the whole project by looking at the section headers. If you need to make changes to any of the sections, click on the section header to expand it and make the necessary adjustments.
When you are satisfied that all the information in the project is correct, click on Create Project at the top or bottom of the project set-up page. Once you click on Create Project, the invitation emails are sent out to the named candidates on the project.
TalentCentral™ is our new online platform. Not only does it offer you a faster, easier way of accessing your assessments, but it allows you to use SHL data to benefit your organization. And the science is just as strong as it ever was.
The TalentCentral™ platform has a lot to offer. Its real-time dashboards and insightful reports make it a powerful tool for organizations to analyze and manage their talent programs. It gives you the information you need to make better decisions and drive business results. With the TalentCentral™ platform, talent data is easy to manipulate, interpret and share.
Creating, managing and analyzing your assessment projects become much easier due to the administrative interface’s intuitive design, streamlined workflows and availability across multiple browsers and devices.
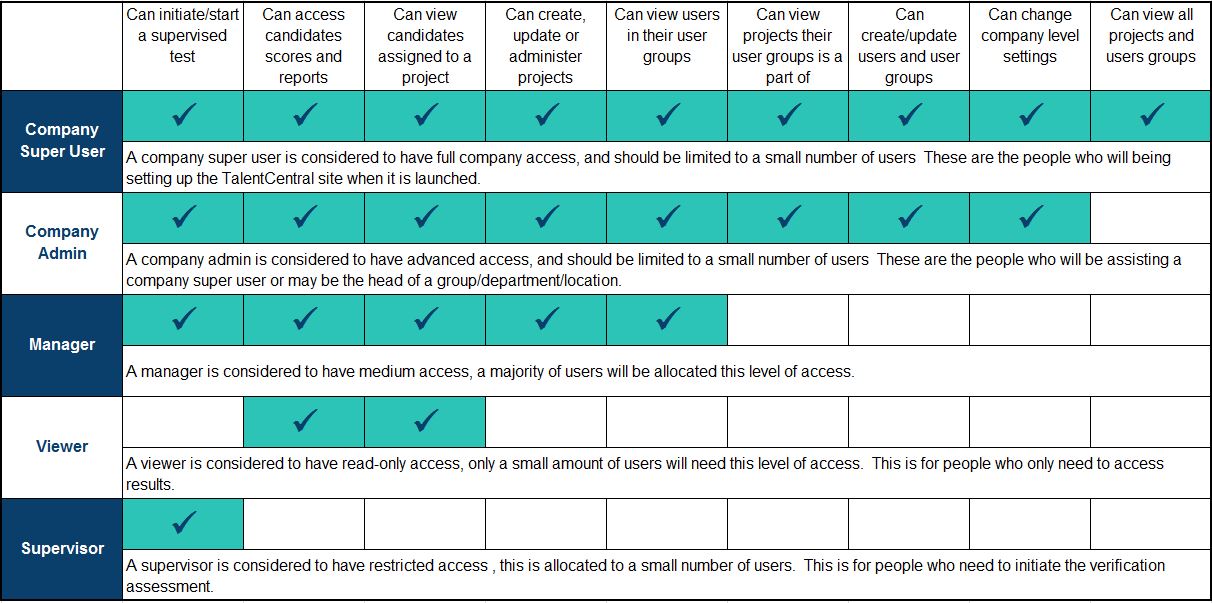
When creating a new user on the TalentCentral™ platform, the permission level you choose determines the level of access the user will have on the system. Some user levels, such as Manager, will be assigned more often, while Supervisor or Viewer are more restrictive and may be used less frequently. In order to avoid inadvertent changes to your company settings, Company Admin should only be selected for a limited number of trained individuals.
Company Super Users can change user permission levels. If you don't know who in your company is a Company Super User, you can get in touch with our Technical Support teams by using the Contact Form widget on the right side of this page, who can provide you with this information.
A user must be assigned to a project, whether via their user group or as an individual, in order to view and make changes to the project dependent on their permission level.
Click on the attachment below to view a larger copy of the image.
A user must be assigned to a project, whether via their user group or as an individual, in order to view and make changes to the project dependent on their permission level.
Click on the attachment below to view a larger copy of the image.
TalentCentral™ allows messages to be placed at different points of the candidate assessment experience. You can use a pre-existing standard system message or a company superuser can create a tailored message.
When setting up your project, you can choose a pre-existing candidate message by clicking on the Candidate Messages section header.
Both standard system messages and messages created by a company superuser will be displayed. Select the message you would like to be displayed to candidates at each stage of the assessment experience.
To create a candidate message, click on the Welcome button in the top right corner of your screen and select Settings.
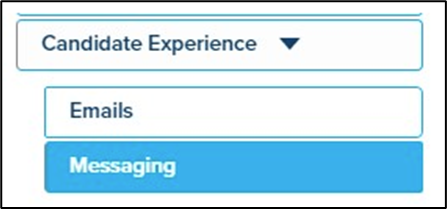
You will be taken to the summary page. Click on the Candidate Experience menu and select Messaging.
Select the relevant type of message you wish to customise.
Click on + Create a new message and type the message you would like to be displayed to candidates. Please note, if you are assessing candidates in multiple languages, a separate message will have to be created for each language.
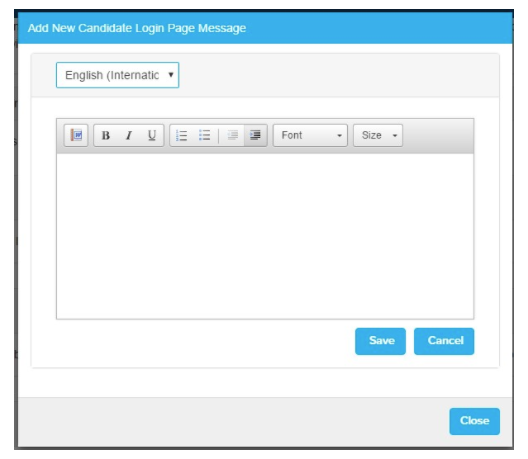
Once you have saved your message, it will be displayed in the list of Candidate Messages in the project. Within each stage, you can predefine the message you would like to have preselected as the default for all projects. However, this can still be changed on the individual project.
When setting up your project, you can choose a pre-existing candidate message by clicking on the Candidate Messages section header.
Both standard system messages and messages created by a company superuser will be displayed. Select the message you would like to be displayed to candidates at each stage of the assessment experience.
To create a candidate message, click on the Welcome button in the top right corner of your screen and select Settings.
You will be taken to the summary page. Click on the Candidate Experience menu and select Messaging.
Select the relevant type of message you wish to customise.
Click on + Create a new message and type the message you would like to be displayed to candidates. Please note, if you are assessing candidates in multiple languages, a separate message will have to be created for each language.
Once you have saved your message, it will be displayed in the list of Candidate Messages in the project. Within each stage, you can predefine the message you would like to have preselected as the default for all projects. However, this can still be changed on the individual project.
Response Reuse copies the candidate’s responses from their previous assessment to their new one. This occurs if you add a candidate with the same email address and the same assessment to a project within a specified time period. Candidates using a multiple use link will have their responses reused once they reach the assessment homepage. If you are adding named candidates to a project, their responses will be reused once you click on Update Project.
The default time period varies by assessment type and is listed below:
The default time period varies by assessment type and is listed below:
| Classification | Occurs if previous session completed within |
| Personality | 180 Days |
| Solutions | 180 Days |
| Ability | 30 Days |
| Skills | No Response Reuse |
Please note that the time periods can be customised. Please contact your local SHL Technical Support team to make the changes.
Company Super Users and Company Admin Users of the TalentCentral™ platform may wish to assign certain users to particular groups, for example "New York HR Team".
Users will be able to perform certain tasks on projects dependent on their system permission level and the projects their User Group has been assigned to.
To create a new User Group:
Users will be able to perform certain tasks on projects dependent on their system permission level and the projects their User Group has been assigned to.
To create a new User Group:
- Under Welcome, click on your name at the top right corner of your screen and select Settings
- Click on Users on the left of your screen to expand further options
- Select Manage User Groups
- Click on +New User Group on the right side of the page
- You will have to enter a Group Name, however the Group Description field is optional
- Search for your users under Select Users and click on them to add them to the group
- Once you are happy with your choices, click on Create
An Assessment Profile is a collection of assessments and reports that can be used as a basis for creating projects. These are saved in your TalentCentral™ platform account and can be added to a project. Assessment Profiles can be used to ensure the consistent measurement of job competencies across hiring events and teams.
To create an Assessment Profile:
To create an Assessment Profile:
- Click on Create New from the top menu bar and select Assessment Profile.
- Enter a name for your Assessment Profile. You may also choose to select a Level, Family and a Description, but these are optional
- Under Select Products*, search for the tests you would like to add to your Assessment Profile
- Click on the test name to view a description and, if applicable, specify the test level, language and comparison group
- To add the test to your project, click on the Add button. You may be prompted to select related items, if applicable. Click on Done when you have made your choice
- Confirm that Selected Products contain all the tests you wish to include in the Assessment Profile
- Click on Save when you are satisfied with your choices
However, if you wish to create a project using your newly created Assessment Profile, click on +Save and Create Project.
The TalentCentral™ platform’s real-time dashboards allow you to view your site metrics and data in a variety of different formats using a number of preset modules.
To create a new dashboard you need to be logged into your TalentCentralTM account.
Click on Dashboard from the top menu bar.
Click on Global Settings and select the date range you would like to see the data for. You can select a specific date or use the Quick date options before clicking on Apply.
Click on the + Create New button on the far left of your screen.
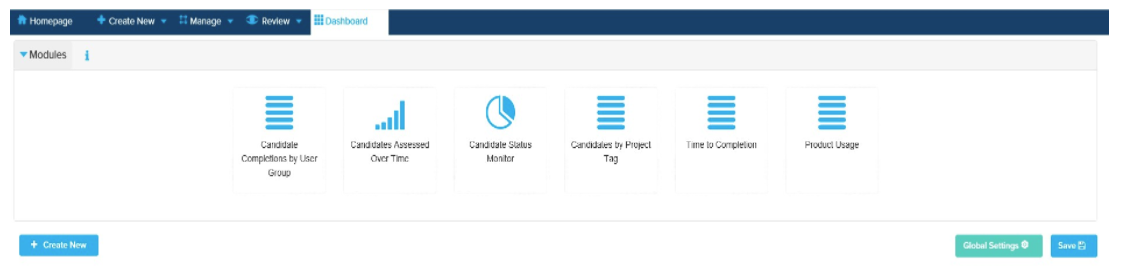
Double-click the module you would like to use to add it to your dashboard. If you wish to change the order of the modules simply drag the modules into the desired position on the grid presented.
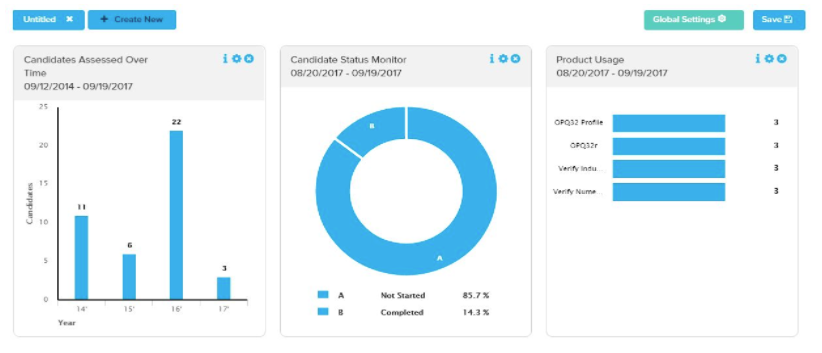
The individual modules display the following information:
Candidate Completions by User Group:
This lists the user groups in the order of activity (from high to low). Activity includes project creation, modification and candidate-related updates. You can adjust the date range by clicking on the gear icon on the module to display the Last 30, 60 or 90 Days.
Candidates Assessed Over Time:
This lists the number of candidates who have completed all the assessments in a project. You can adjust the date range by clicking on the gear icon on the module to display the Last 30, 60 or 90 Days.
Candidate Status Monitor:
This lists candidate tests by Not Started, Started, Completed, Recalled and Others and is displayed as a percentage. You can adjust the date range by clicking on the gear icon on the module to display the Last 30, 60 or 90 Days.
Candidates by Project Tag:
This displays the number of candidates by project tag.
Time to Completion:
This displays the average time a candidate takes to complete an assessment from the moment the link was sent to them. You can adjust the date range by clicking on the gear icon on the module to display the Last 30, 60 or 90 Days or filter the information by Project or Assessment Profile.
Product Usage:
This displays the number of times an assessment has been used. You can adjust the date range by clicking on the gear icon on the module to display the Last 30, 60 or 90 Days or filter by Assessments, Categories or Classification.
When you have selected all the modules you would like to display on your Dashboard, double-click on Untitled to give your dashboard a name. Before you leave the page, please make sure you have clicked on Save in the top right corner.
To create a new dashboard you need to be logged into your TalentCentralTM account.
Click on Dashboard from the top menu bar.
Click on Global Settings and select the date range you would like to see the data for. You can select a specific date or use the Quick date options before clicking on Apply.
Click on the + Create New button on the far left of your screen.
Double-click the module you would like to use to add it to your dashboard. If you wish to change the order of the modules simply drag the modules into the desired position on the grid presented.
The individual modules display the following information:
Candidate Completions by User Group:
This lists the user groups in the order of activity (from high to low). Activity includes project creation, modification and candidate-related updates. You can adjust the date range by clicking on the gear icon on the module to display the Last 30, 60 or 90 Days.
Candidates Assessed Over Time:
This lists the number of candidates who have completed all the assessments in a project. You can adjust the date range by clicking on the gear icon on the module to display the Last 30, 60 or 90 Days.
Candidate Status Monitor:
This lists candidate tests by Not Started, Started, Completed, Recalled and Others and is displayed as a percentage. You can adjust the date range by clicking on the gear icon on the module to display the Last 30, 60 or 90 Days.
Candidates by Project Tag:
This displays the number of candidates by project tag.
Time to Completion:
This displays the average time a candidate takes to complete an assessment from the moment the link was sent to them. You can adjust the date range by clicking on the gear icon on the module to display the Last 30, 60 or 90 Days or filter the information by Project or Assessment Profile.
Product Usage:
This displays the number of times an assessment has been used. You can adjust the date range by clicking on the gear icon on the module to display the Last 30, 60 or 90 Days or filter by Assessments, Categories or Classification.
When you have selected all the modules you would like to display on your Dashboard, double-click on Untitled to give your dashboard a name. Before you leave the page, please make sure you have clicked on Save in the top right corner.
If you want candidates to be able to self-register for a test, you can create a project and enable the Multiple Use Link option in the Candidate section.
Multiple Use links cannot be used to retest a candidate within the same project.
If you have the Duplicate (or Duplication) Application Check setting turned on and want to allow your candidates to complete a test again, we recommend you add them again individually by creating a Single Use link.
Create a Multiple Use link
Create a project as you normally would, entering all the required fields. Learn how to create a project
Under Candidates*, click Enable Multiple Use Link on the right side of the screen. Enter the number of candidates you want to take the test on this project (up to a maximum of 9999).
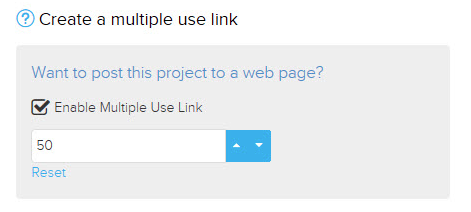
Work through all the remaining sections of the project setup. When you are satisfied that all the choices on your project are correct, click on Create Project.
When the confirmation message is displayed, click on View Project. Click on Add Candidates. Click on the Multi Use Link button that will now be displayed under the Multi User Link Information header.
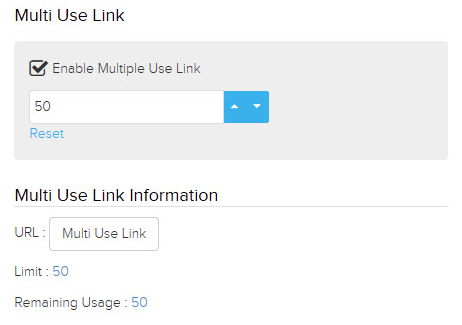
Click on the clipboard icon to the right of the URL to copy it to share with your candidates.
Work through all the remaining sections of the project setup. When you are satisfied that all the choices on your project are correct, click on Create Project.
When the confirmation message is displayed, click on View Project. Click on Add Candidates. Click on the Multi Use Link button that will now be displayed under the Multi User Link Information header.
Click on the clipboard icon to the right of the URL to copy it to share with your candidates.
A project tag is a feature that allows you to link your projects to data, e.g. departments, geographical locations, etc., which can make reporting easier as you can narrow your search to only those areas of interest.
To create a project tag, please contact your Company Super User or Company Admin.
To add Project Tags to your system, click on the Welcome button in the top right corner of your screen and select Settings.
You will be taken to the Summary page. Click on the Admin Experience menu and select Tags.
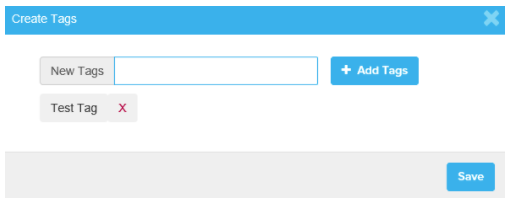
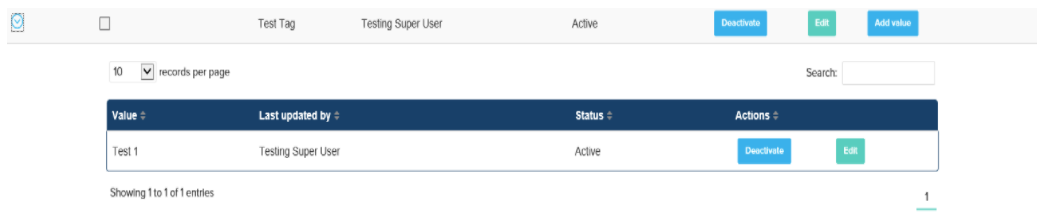
To create a new tag, click on +New Tag and name the tag. Click on + Add Tags to add additional tags. Click on Save once all your tags have been created. Tags will automatically be added to your system.
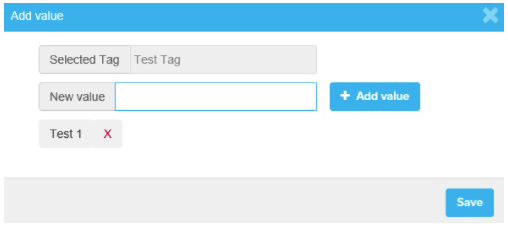
You will now need to add values to your tags. Click on +Add Value and name the value. Click on + Add Value to add additional values. Click on Save once all your values have been created.
Tags and tag values can be edited or deactivated by clicking on the Edit or Deactivate buttons on the page.
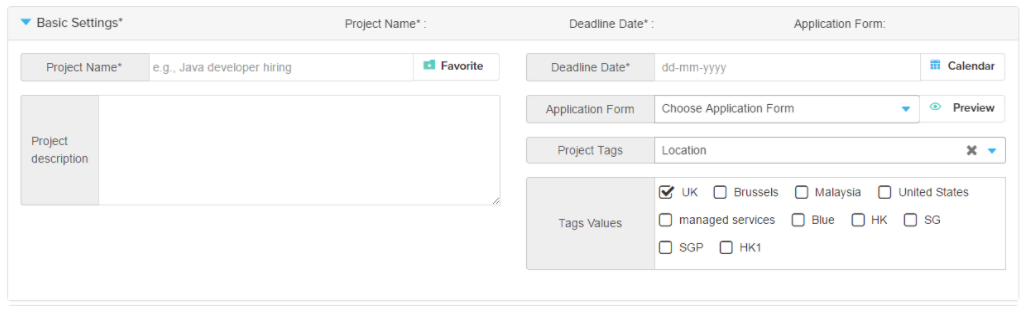
Adding project tags to your project:
Click on Basic Settings and select a project tag from the Project Tags drop-down.
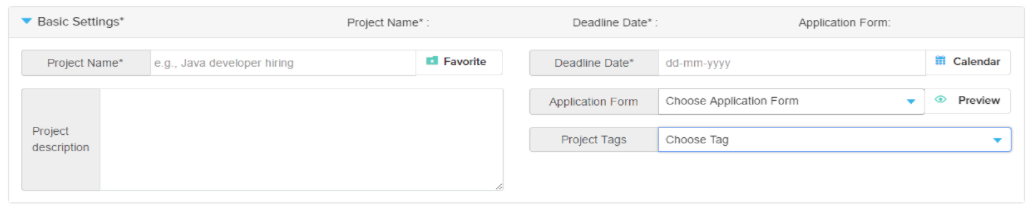
This will display all of the Tags Values. Select the value you would like to add your project to.
To create a project tag, please contact your Company Super User or Company Admin.
To add Project Tags to your system, click on the Welcome button in the top right corner of your screen and select Settings.
You will be taken to the Summary page. Click on the Admin Experience menu and select Tags.
To create a new tag, click on +New Tag and name the tag. Click on + Add Tags to add additional tags. Click on Save once all your tags have been created. Tags will automatically be added to your system.
You will now need to add values to your tags. Click on +Add Value and name the value. Click on + Add Value to add additional values. Click on Save once all your values have been created.
Tags and tag values can be edited or deactivated by clicking on the Edit or Deactivate buttons on the page.
Adding project tags to your project:
Click on Basic Settings and select a project tag from the Project Tags drop-down.
This will display all of the Tags Values. Select the value you would like to add your project to.
Stages allow you to group one or more assessments. If your candidate meets the benchmark for a given stage, you can choose if you wish for them to progress to the next stage to complete further assessments. Stages can be combined with Hurdles.
Hurdles can be used to automatically progress candidates to the next stage if they achieve the minimum percentile score that you have defined during project set up. Please note that this does not apply to personality questionnaires, as they do not have percentile scores.
Hurdles can be used to automatically progress candidates to the next stage if they achieve the minimum percentile score that you have defined during project set up. Please note that this does not apply to personality questionnaires, as they do not have percentile scores.
SHL has created a corresponding project tag for each Solution purchased by your organisation, for example Graduate Advanced. These tags will appear on all projects you create and, by selecting the relevant tag, your organisation will be able to accurately track and report the usage of the Solution/s.
To further ensure reporting is as precise as possible, we have made it mandatory for administrators to select a Solution tag when creating a project. Reports showing the usage against project tags will be made available to specific administrators through the new ‘Extranet’ file delivery service that has been enabled on your account.
Please see the attached document for more information.
We have built the TalentCentral™ platform to make it as accessible as possible for candidates with disabilities.
The TalentCentral™ platform offers:
The TalentCentral™ platform offers:
- Support for the most commonly used screen readers, voice control software and screen magnification tools
- Alternative colour schemes and display options, some of which are designed to improve the experience for people with dyslexia
- Improved navigation for those who prefer to only use a keyboard
Depending on your user permissions, you can extend the time limit on a test by up to 100%, e.g. a 20-minute test can be extended to 40 minutes.
Further information on how to support candidates with disabilities is available on our website. For specific training on TalentCentral™, please book onto a training course.
Adding a large number of named candidates to a project can be time consuming. Bulk Import allows you to upload multiple candidates in one go using a template. All you need are the candidates' first and last names and their email addresses.
Using Bulk Import:
- Create a project as you normally would, entering all the required fields. How do I create a project and send out a test using the TalentCentral™ platform?
- Under Candidates, click on Download a template file to get a template. Alternatively, you can use the file attached to this article
- Save the file somewhere where you can easily locate it later and then open it in a spreadsheet application, such as MS Excel
- Enter the candidates' title in column A, their first name in column B, their last name in Column C, their email address in Column D and a language code in column E. For more information about these options, click on [Need help?] on the project page
- Make sure you save the file in an Unicode text format
- Return to the project the candidates will be added to
- Under Candidates, click on Bulk Import
- Search for the file at the location you saved it in and choose Open
- Scroll down to check that your candidates have been added to your project
- Work through all the remaining sections of the project set-up as per usual. When you are satisfied that all the choices you have made on the project are correct, click on Create Project. This will send an invitation email to all the candidates that have been added using Bulk Import providing their email addresses are correct
You can create Single Use links when you know who your candidates are but also when you don’t yet have your candidate’s details.
If you want candidates to be able to self-register for a test, you can create a project and enable the Multiple Use Link option in the Candidate section. Learn how to create a Multiple Use link
Create a Single Use link – Known Candidates
Create a project as you normally would, entering all the required fields. Learn how to create a project
Under Candidates* (for new projects) or Add Candidates (for existing projects) you will see an Add individual candidates section.
At a minimum, you will need to add an Email address* and make sure you select the correct Language option but, if you have your candidate’s details, it is recommended that you enter them as you create the link. If you do not fill in the First Name and Last Name fields then your candidate will be prompted to complete these fields when they first log in.
Once you have filled in all the details, click on +Add to create a Single Use link, which will appear under the Candidates added to the project section below. Once you have finished adding all of your candidates to the project, click on Create Project (for new projects) or Update Project (for existing projects).
Your Single Use links will be generated and automatically sent to your candidates once you have published, or updated, your project.
Create a Single Use link – Unknown Candidates
Create a project as you normally would, entering all the required fields. Learn how to create a project
Under Candidates* (for new projects) or Add Candidates (for existing projects) you will see an Add individual unknown candidates section where you can enter the number of candidates you want Single Use links for.
Work through all the remaining sections of the project setup. When you are satisfied that all the choices on your project are correct, click on Create Project (for new projects) or Update Project (for existing projects). When the confirmation message is displayed, click on View Project.
Click on Manage Candidates to view the Single Use links.
There are two ways you can send out the test links. Once you have your candidate’s details, you can right-click on the Link text and then click Copy Link Address. Paste the test link (using CTRL + V) to an email to your candidate inviting them to complete the test.
Alternatively, click on the Edit text to edit the candidate’s Title, First Name, Last Name, Email and the Language of the test. Click on Save then Update Project, which will save the candidate’s details and trigger the standard TalentCentral invitation email to the candidate.
If you are unable to access your TalentCentral™ platform account, please contact a TalentCentral™ platform administrator at your company. Please be advised that for security reasons your TalentCentral™ account may be disabled if you haven't accessed it in the last three months.
If you are the only administrator in your company and need help, please get in touch with us by using the Contact Form widget on the right side of this page.
If you are the only administrator in your company and need help, please get in touch with us by using the Contact Form widget on the right side of this page.
We apply monthly performance-related maintenance activities to all SHL systems. Each of the maintenance periods will require downtime during which there will be no access for candidates or administrators. The system maintenance windows are scheduled out of normal business hours to minimise the impact on our clients and candidates.
You can check when these are scheduled by clicking on the Scheduled Maintenance widget on the right side of this page. You will not be able to access the system or complete assessments when it is unavailable due to maintenance activities. If you attempt to access the system during scheduled maintenance a system notification will appear with information of the time and date that the system will be available again.
If you log back into the system after scheduled maintenance but are still receiving the maintenance notification, clear your browser history and cookies. Once you have done this, restart your browser and access the assessment as per the original instructions.
If you have any questions, please get in touch with your local Technical Support team by clicking on the Contact Form widget on the right side of this page.
Please find attached the Release Notes from June - December 2021.
Please find attached the Release Notes from January - December 2022.
Please find attached the Release Notes from January 2023 - December 2023.
Please find attached the Release Notes from January 2024 - December 2024.
Please find attached the Release Notes from January 2025 - December 2025.
![$Label["Widget.Alt_ContactForm"]](./assets/img/outline_contact_page_black_24dp.png)

