

[
Please note, this article may mention sections of the system that you do not have enabled, or that you do not have permission to view. If you would like to access these sections of your system, you will need to contact your Account Manager who can discuss your options with you. Alternatively, please skip any irrelevant sections of the article and move on to the next step.
Please note, for the purpose of this article, candidates will be referred to as 'participants'.
To set up your candidates with assessments, you will need to create a project in TalentCentral+™
Create project and choose assessments
- Log in to TalentCentral+™
- In the top left menu, under Projects, click on Create Project
- What you will see in the pop-up box will depend on what you have bought from SHL
- Choose a project type then click on Next
- Please note that, if you have bought Experience templates, these will be available for you to choose from, otherwise you will see a padlock on this tab
- If you would like to buy Experience templates, please contact your Account Manager
- Under Project details, choose a Project name and confirm the Project type (Solution) is showing the option you chose in the previous step
- The Project catalog section will default to display All the available assessments on your system, but you can use the bookmarks below this option to narrow your search
- Click on the Configure text next to any of the assessments you want to include in your project
- A pop-up box will appear where, on the left, you will see a brief description of the assessment as well as the time (Assessment duration) your participant will need to complete the assessment
- Here, you can choose your Assessment language and Add reports
- When you click on Add reports you will see which reports are available for your chosen assessment and the languages the report is available in
- Click on the box to select the report then click to Add to assessment
- Your chosen report will be added to the Reports section where you will see an option to Share with participants, if you wish to
- Click on Add to project
- The assessment(s) and reports you have chosen will appear at the bottom of your screen under Selected products
- If you want to remove any of your chosen products, click on the minus symbol in the circle next to it
- Please note that, once you have published your project, you will not be able to add any additional products so make sure you have added all the products you need before moving on to the next section
- Once you have chosen all the assessments you want to add to your project, click on Save & next
Define stage(s)
- As a default, your assessments and reports will be listed under Assessments in Stage 1
- Here, you can click on the Settings wheel on the assessment to review the choices you made for that assessment
- If you want to split your assessments into different stages, click on Add stage in the bottom right and add as many stages as you need
- It is a good idea to Add stage name to each stage but it is optional
- Within a stage, you can choose to order your assessments in the Order shown or you can choose for them to be shown to your participants in Any order
- You can click on the six dots next to an assessment to drag it to a new position in the stage list, or even to a different stage
- Alternatively, you can move assessments to different stages by clicking on the box next to the assessment then clicking on Move to stage and choosing the relevant stage
- To remove a stage, click on the three vertical dots on the right and Remove stage
- If you have added any additional stages to your project, you will need to choose your Progression Criteria for every stage except for the last one
- If you choose Score-based progression or invitation, you will need to choose an option from the Minimum score to progress drop-down for each assessment in your stage
- At the top of the page, under Stage settings, you can choose to Hide the next stages from participants and, if applicable, choose your Banding template and Edit band values, if you wish to
- If you want to add a template to the Banding template list, you will need to contact your Account Manager
- Click on Save & next to move on to the Participant experience section
Participant experience
- Here, you can choose what devices you would like the assessment(s) to be available on
- You can also choose the default language for all on-screen text and communications - please note, the option you choose here is not the language your participants will see the assessment in as this will be the option you chose in the previous step
- Under On Screen Messages, you can preview the Available messages in your system, which can be chosen when you add your participants to the project
- If you wish to use an Application form, you will be given the option to Use existing or Create New
- Please note, if you customise an existing form it will only be available on this project - if you want to add it to the list of forms, you will need to contact your Account Manager
- Project Proctoring allows you to verify the identify of your participants and inspect the testing environment
- Click on the proctoring options text to read more about the options available
- Some proctoring options have to be added at company level - if you want to add a proctoring option, you will need to contact your Account Manager
- Under Additional experience options, you can choose how many days a participant must wait before they can re-attempt an assessment
- Click on Save & next to move on to the Review & publish section
Review and publish
- On this page, you can choose to Bookmark project by clicking on the ribbon icon on the top right
- Your name will automatically be added to the Project administrators (optional) section as a default
- You can add additional administrators to this section by typing their name into the Project administrators (optional) field, which will bring up a list of all individuals who have been added to your system as Users
- If you want them to receive project update notifications, tick the box below the field
- Project tags allow you to link your projects to data, e.g., departments, office locations, etc., which can make reporting easier as you can narrow your search to only those areas of interest
- As a default, some Project tags will be automatically added to the project for you - if you want to remove any of the tags, click on the x symbol next to it
- You can add new tags by typing into the Project tags (optional) field then clicking out of it to save the tag
- You can choose to add a Project description if you wish to
- At this stage you can choose to Save draft and come back to your project at another time
- If you click on Save draft, you will be taken to your Projects page where you should see your project listed in the table
- From here, you can choose to copy the project or edit it using options on the right
- If you choose to Edit project, you will need to click Save & next through the project until you get to where you left off
- Alternatively, click on Review details, which will bring up a pop-up box where you can review all your project details
- Here, you will be able to see the total Duration of all the assessments you have chosen for your project
- At this stage you can choose to Publish & exit your project or, if you already know who your participants are, you can click to Publish & add people
- If you choose to Publish & exit, you will be take to your Projects page where you should see your published project listed in the table
- Here, you can choose to Add participants under the Actions section of the table or, if you have already added your participants, you could review their Participant details
- If you chose to Publish & add people, you will be taken to the Add people section
- Here, you can choose whether to Bulk upload, Add individually or use a Multiple-use or Single-use link
- If you click on the Save participant group button without adding any participants to your project, you will see a Please add participants or define link count first error message
Adding participants
Bulk upload
- To Bulk upload your participants, download one of the sample files provided (.csv or .xlsx) making sure you save the file in the right format
- If the file does not download, look for a pop-up blocker on the top right-hand side of the search bar - click on the pop-up blocker and click Allow
- Take care not to rearrange any of the columns, or headers, of the file as this will impact how the file is uploaded back into the system
- Add a new serial number (S.no.) for each participant you add to the file
- Only the Email field is mandatory but it is best practice to add a First Name and Last Name
- If you want to add a Mobile Number then make sure you do not include the country code
- You can also add the participant's date of birth (DOB) in the format shown and up to five tags of your choosing
- Before saving and uploading your completed file, make sure the Email field has been completed for each participant, that no two e-mail addresses are the same and that you have deleted the instructions section of the file
- Click on the Upload CSV/XLSX icon on the system, where you will be prompted to find your completed file for uploading
- If you have not completed the file correctly, you will see an error message telling you to follow the instructions contained within the file
- Once your participants have been uploaded, they will appear in the Participants in this group section, where you have the option to Edit their information or Delete them from your project
- In the Set deadline section, you can choose the Country and set the Time zone for your deadline - please note that the information that is defaulted in these fields matches what was chosen when you were set up as a User
- You will need to choose how you set your deadline from two choices - Fixed date or Fixed duration
- For Fixed date, you can choose a Start date and Start time and an End date / Deadline and an End time
- For Fixed duration, you can choose how many days your participants will have to complete their assessment(s) after they have registered on the system
- In the Communications section, you can choose which Participant and Admin templates you would like to use - click on Configure to add Additional recipients or to Preview the template
- Within some of the templates, you can choose to Configure Reminders in your preferred format
- Click on Save participant group, which will bring up a pop-up box where you can review all of your chosen options
- Click on Save participant group to trigger the invitation e-mail to your participant(s)
Add individually
- For participants you want to Add individually, manually enter their details into the form shown - although some fields are optional, it is best practice to add a First name and Last name
- At the bottom of the form you have an option to add Participant tags if you wish to
- At a minimum, the Email field is mandatory so make sure this has been filled in before you click on Add participant
- Once your participant has been added, they will appear in the Participants in this group section, where you have the option to Edit their information or Delete them from your project
- Repeat until all your participants have been added to your project
- In the Set deadline section, you can choose the Country and set the Time zone for your deadline - please note that the information that is defaulted in these fields matches what was chosen when you were set up as a User
- You will need to choose how you set your deadline from two choices - Fixed date or Fixed duration
- For Fixed date, you can choose a Start date and Start time and an End date / Deadline and an End time
- For Fixed duration, you can choose how many days your participants will have to complete their assessment(s) after they have registered on the system
- In the Communications section, you can choose which Participant and Admin templates you would like to use - click on Configure to add Additional recipients or to Preview the template
- Within some of the templates, you can choose to Configure Reminders in your preferred format
- Click on Save participant group, which will bring up a pop-up box where you can review all of your chosen options
- Click on Save participant group to trigger the invitation e-mail to your participant(s)
Multiple-use link
- If you choose the Multiple-use link option, the assessment link that is generated will be the same for all participants
- You can limit the number of times each participant can take the assessment by changing the number in the Link usage limit box - please note, the system will use security questions to work out how many times a participant has previously taken the assessment
- You will need to select which users of the system you want to send the links to by typing their name into the Select company users to send links to box
- In the Set deadline section, you can choose the Country and set the Time zone for your deadline - please note that the information that is defaulted in these fields matches what was chosen when you were set up as a User
- You will need to choose how you set your deadline from two choices - Fixed date or Fixed duration
- For Fixed date, you can choose a Start date and Start time and an End date / Deadline and an End time
- For Fixed duration, you can choose how many days your participants will have to complete their assessment(s) after they have registered on the system
- In the Communications section, you can choose which Participant and Admin templates you would like to use - click on Configure to add Additional recipients or to Preview the template
- Within some of the templates, you can choose to Configure Reminders in your preferred format
- Click on Save participant group, which will bring up a pop-up box where you can review all of your chosen options
- Click on Save participant group to trigger the Multiple-use link e-mail to your chosen user(s) who can send this link on to the participants
Single-use links
- If you choose the Single-use links option, you will get separate assessment links for each participant
- Choose the number of links you want by changing the number in the Number of unique links box
- You will need to select which users of the system you want to send the links to by typing their name into the Select company users to send links to box
- In the Set deadline section, you can choose the Country and set the Time zone for your deadline - please note that the information that is defaulted in these fields matches what was chosen when you were set up as a User
- You will need to choose how you set your deadline from two choices - Fixed date or Fixed duration
- For Fixed date, you can choose a Start date and Start time and an End date / Deadline and an End time
- For Fixed duration, you can choose how many days your participants will have to complete their assessment(s) after they have registered on the system
- In the Communications section, you can choose which Participant and Admin templates you would like to use - click on Configure to add Additional recipients or to Preview the template
- Within some of the templates, you can choose to Configure Reminders in your preferred format
- Click on Save participant group, which will bring up a pop-up box where you can review all of your chosen options
- Click on Save participant group to trigger the Single-use links e-mail to your chosen user(s) who can send the link(s) on to the participant(s)
If you have any questions, please get in touch with your local Technical Support team by clicking on the Contact Form widget on the right side of this page.
]
[
Please note, this article may mention sections of the system that you do not have enabled, or that you do not have permission to view. If you would like to access these sections of your system, you will need to contact your Account Manager who can discuss your options with you. Alternatively, please skip any irrelevant sections of the article and move on to the next step.
Please note, for the purpose of this article, candidates will be referred to as 'participants'.
Locating your project
- Log in to TalentCentral+™
- In the top left menu, under Projects, click on View all projects
- On the Projects page, you can customise your view of the page by clicking on Manage columns on the right and choosing whether you want to Save this configuration for all users
- Check that the drop-down at the top is set to Project then you can use the Filter and/or the search bar at the top of the page to narrow your search
- Under Actions, click on Add participants next to the right project
- If you click on the Save participant group button without adding any participants to your project, you will see a Please add participants or define link count first error message
Adding participants
Bulk upload
- To Bulk upload your participants, download one of the sample files provided (.csv or .xlsx) making sure you save the file in the right format
- If the file does not download, look for a pop-up blocker on the top right-hand side of the search bar - click on the pop-up blocker and click Allow
- Take care not to rearrange any of the columns, or headers, of the file as this will impact how the file is uploaded back into the system
- Add a new serial number (S.no.) for each participant you add to the file
- Only the Email field is mandatory but it is best practice to add a First Name and Last Name
- If you want to add a Mobile Number then make sure you do not include the country code
- You can also add the participant's date of birth (DOB) in the format shown and up to five tags of your choosing
- Before saving and uploading your completed file, make sure the Email field has been completed for each participant, that no two e-mail addresses are the same and that you have deleted the instructions section of the file
- Click on the Upload CSV/XLSX icon on the system, where you will be prompted to find your completed file for uploading
- If you have not completed the file correctly, you will see an error message telling you to follow the instructions contained within the file
- Once your participants have been uploaded, they will appear in the Participants in this group section, where you have the option to Edit their information or Delete them from your project
- In the Set deadline section, you can choose the Country and set the Time zone for your deadline - please note that the information that is defaulted in these fields matches what was chosen when you were set up as a User
- You will need to choose how you set your deadline from two choices - Fixed date or Fixed duration
- For Fixed date, you can choose a Start date and Start time and an End date / Deadline and an End time
- For Fixed duration, you can choose how many days your participants will have to complete their assessment(s) after they have registered on the system
- In the Communications section, you can choose which Participant and Admin templates you would like to use - click on Configure to add Additional recipients or to Preview the template
- Within some of the templates, you can choose to Configure Reminders in your preferred format
- Click on Save participant group, which will bring up a pop-up box where you can review all of your chosen options
- Click on Save participant group to trigger the invitation e-mail to your participant(s)
Add individually
- For participants you want to Add individually, manually enter their details into the form shown - although some fields are optional, it is best practice to add a First name and Last name
- At the bottom of the form you have an option to add Participant tags if you wish to
- At a minimum, the Email field is mandatory so make sure this has been filled in before you click on Add participant
- Once your participant has been added, they will appear in the Participants in this group section, where you have the option to Edit their information or Delete them from your project
- Repeat until all your participants have been added to your project
- In the Set deadline section, you can choose the Country and set the Time zone for your deadline - please note that the information that is defaulted in these fields matches what was chosen when you were set up as a User
- You will need to choose how you set your deadline from two choices - Fixed date or Fixed duration
- For Fixed date, you can choose a Start date and Start time and an End date / Deadline and an End time
- For Fixed duration, you can choose how many days your participants will have to complete their assessment(s) after they have registered on the system
- In the Communications section, you can choose which Participant and Admin templates you would like to use - click on Configure to add Additional recipients or to Preview the template
- Within some of the templates, you can choose to Configure Reminders in your preferred format
- Click on Save participant group, which will bring up a pop-up box where you can review all of your chosen options
- Click on Save participant group to trigger the invitation e-mail to your participant(s)
Multiple-use link
- If you choose the Multiple-use link option, the assessment link that is generated will be the same for all participants
- You can limit the number of times each participant can take the assessment by changing the number in the Link usage limit box - please note, the system will use security questions to work out how many times a participant has previously taken the assessment
- You will need to select which users of the system you want to send the links to by typing their name into the Select company users to send links to box
- In the Set deadline section, you can choose the Country and set the Time zone for your deadline - please note that the information that is defaulted in these fields matches what was chosen when you were set up as a User
- You will need to choose how you set your deadline from two choices - Fixed date or Fixed duration
- For Fixed date, you can choose a Start date and Start time and an End date / Deadline and an End time
- For Fixed duration, you can choose how many days your participants will have to complete their assessment(s) after they have registered on the system
- In the Communications section, you can choose which Participant and Admin templates you would like to use - click on Configure to add Additional recipients or to Preview the template
- Within some of the templates, you can choose to Configure Reminders in your preferred format
- Click on Save participant group, which will bring up a pop-up box where you can review all of your chosen options
- Click on Save participant group to trigger the Multiple-use link e-mail to your chosen user(s) who can send this link on to the participants
Single-use links
- If you choose the Single-use links option, you will get separate assessment links for each participant
- Choose the number of links you want by changing the number in the Number of unique links box
- You will need to select which users of the system you want to send the links to by typing their name into the Select company users to send links to box
- In the Set deadline section, you can choose the Country and set the Time zone for your deadline - please note that the information that is defaulted in these fields matches what was chosen when you were set up as a User
- You will need to choose how you set your deadline from two choices - Fixed date or Fixed duration
- For Fixed date, you can choose a Start date and Start time and an End date / Deadline and an End time
- For Fixed duration, you can choose how many days your participants will have to complete their assessment(s) after they have registered on the system
- In the Communications section, you can choose which Participant and Admin templates you would like to use - click on Configure to add Additional recipients or to Preview the template
- Within some of the templates, you can choose to Configure Reminders in your preferred format
- Click on Save participant group, which will bring up a pop-up box where you can review all of your chosen options
- Click on Save participant group to trigger the Single-use links e-mail to your chosen user(s) who can send the link(s) on to the participant(s)
If you have any questions, please get in touch with your local Technical Support team by clicking on the Contact Form widget on the right side of this page.
]
[
Please note, this article may mention sections of the system that you do not have enabled, or that you do not have permission to view. If you would like to discuss these sections of your system, you will need to contact your Account Manager who can discuss your options with you. Alternatively, please skip any irrelevant sections of the article and move on to the next step.
Please note, for the purpose of this article, candidates will be referred to as 'participants'.
There are two ways to trigger an e-mail to your participant. You can Send reminder or use the Reschedule options to send them a new e-mail with the same assessment link. These actions can only be carried out for participants who have not started their assessments. Reschedule will also work for participants whose assessment has expired.
Locating your project
- Log in to TalentCentral+™
- In the top left menu, under Projects, click on View all projects
- On the Projects page, you can customise your view of the page by clicking on Manage columns on the right and choosing whether you want to Save this configuration for all users
- Check that the drop-down at the top is set to Project then use the Filter and/or search bar at the top of the page to narrow your search
- If you only have participant-specific information to search with, you can change the drop-down to Participant email, Participant Id or SVAR ID, as applicable, then type your information into the search bar, which will bring up any projects that participant is in - Participant Id and SVAR IDs are 14 or 15-digit IDs allocated to a participant once they log in to take an assessment
Resending link
- Under Actions, click on Participant details next to the right project
- The actions that are available to you on the Participants page will depend on your user role and the status of the participant
- On this page, you can scroll down the list to find your participant(s), or you can use the Filter and/or the search bar at the top of the page to narrow your search
- Once you have located your participant, click on the three vertical dots under Actions
- Click on Send reminder to trigger a reminder e-mail to the participant, using an e-mail template of your choice or using the default Participant deadline reminder - if all assessments have been completed, this option will be greyed out
- Alternatively, you will have the option to Reschedule their assessment(s) by making new selections on the Set deadline page
If you have any questions, please get in touch with your local Technical Support team by clicking on the Contact Form widget on the right side of this page.
]
[
Please note, this article may mention sections of the system that you do not have enabled, or that you do not have permission to view. If you would like to access these sections of your system, you will need to contact your Account Manager who can discuss your options with you. Alternatively, please skip any irrelevant sections of the article and move on to the next step.
Please note, for the purpose of this article, candidates will be referred to as 'participants'.
Locating your project
- Log in to TalentCentral+™
- In the top left menu, under Projects, click on View all projects
- On the Projects page, you can customise your view of the page by clicking on Manage columns on the right and choosing whether you want to Save configuration for all users
- Check that the drop-down at the top is set to Project then use the Filter and/or the search bar at the top of the page to narrow your search
- If you only have participant-specific information to search with, you can change the drop-down to Participant email, Participant Id or SVAR ID, as applicable, then type your information into the search bar, which will bring up any projects that participant is in - Participant Id and SVAR IDs are 14 or 15-digit IDs allocated to a participant once they log in to take an assessment
- Under Actions, click on Participant details next to the right project
Recalling an invitation
- The actions that are available to you on the Participants page will depend on your user role and the status of the participant
- On this page, you can scroll down the list to find your participant(s), or you can use the Filter and/or the search bar at the top of the page to narrow your search
- Clicking on the three vertical dots under Actions will allow you to perform different actions depending on what stage of the assessment process the participant is in
- For participants who have not started their assessment(s), or who are partway through, you will have the option to Recall invitation, which will display a This link is not currently valid message to participants when they click on the Start now button in their invitation e-mail or try and proceed through their assessment
If you have any questions, please get in touch with your local Technical Support team by clicking on the Contact Form widget on the right side of this page.
]
[ ]
- Log in to TalentCentral+™
- In the top right, click on your name then Profile
- Here, you can edit your:
- First name
- Last name
- Phone number
- Username
- Country
- Time zone
- To return to the dashboard, click on the company logo on the top left of the system
If you have any questions, please get in touch with your local Technical Support team by clicking on the Contact Form widget on the right side of this page.
[
Please note, this article may mention sections of the system that you do not have enabled, or that you do not have permission to view. If you would like to access these sections of your system, you will need to contact your Account Manager who can discuss your options with you. Alternatively, please skip any irrelevant sections of the article and move onto the next step.
Please note, for the purpose of this article, candidates will be referred to as 'participants'.
Locating your project
- Log in to TalentCentral+™
- In the top left menu, under Projects, click on View all projects
- On the Projects page, you can customise your view of the page by clicking on Manage columns on the right and choosing whether you want to Save configuration for all users
- Check that the drop-down at the top is set to Project then you can use the Filter and/or the search bar at the top of the page to narrow your search
- If you only have participant-specific information to search with, you can change the drop-down to Participant email, Participant Id or SVAR ID, as applicable, then type your information into the search bar, which will bring up any projects that participant is in - Participant Id and SVAR IDs are 14 or 15-digit IDs allocated to a participant once they log in to take an assessment
Archiving project
- Under Actions, click on the three vertical dots then Archive project
- The archived project will stay in the table with an Unarchive project button under Actions - users will not be able to send out any assessment links to participants from the project unless it is unarchived
If you have any questions, please get in touch with your local Technical Support team by clicking on the Contact Form widget on the right side of this page.
]
[
Please note, this article may mention sections of the system that you do not have enabled, or that you do not have permission to view. If you would like to access these sections of your system, you will need to contact your Account Manager who can discuss your options with you. Alternatively, please skip any irrelevant sections of the article and move on to the next step.
Please note, for the purpose of this article, candidates will be referred to as 'participants'.
You will need to choose your deadline when you add your participants to your project. This article assumes you have already created a project. If you have not yet created a project, and/or you want more information on how to add participants to an existing project, please refer to How do I set up my candidates to take assessments on TalentCentral+™?
Locating your project
- Log in to TalentCentral+™
- In the top left menu, under Projects, click on View all projects
- On the Projects page, you can customise your view of the page by clicking on Manage columns on the right and choosing whether you want to Save this configuration for all users
- Check that the drop-down at the top is set to Project then you can use the Filter and/or the search bar at the top of the page to narrow your search
Adding participants
- Under Actions, click on Add participants next to the right project
- Here, you can choose whether to Bulk upload, Add individually or use a Multiple-use or Single-use link
- Whichever method you use to add your participants, you will need to choose how you set your deadline from two choices - Fixed date or Fixed duration
- For Fixed date, you can choose a Start date and Start time and an End date / Deadline and an End time
- For Fixed duration, you can choose how many days your participants will have to complete their assessment(s) after they have registered on the system
- Once you have made your choices in the Communications section, click on Save participant group, which will bring up a pop-up box where you can review all of your chosen options
- Click on Save participant group
- If you have used Bulk upload or Add individually, saving the participant group will trigger the invitation e-mail to your participants
- If you have used Multiple-use or Single-use link(s), saving the participant group will trigger and e-mail to your chosen user(s) who can send the link(s) on to the participant(s)
If you have any questions, please get in touch with your local Technical Support team by clicking on the Contact Form widget on the right side of this page.
]
[
Please note, this article may mention sections of the system that you do not have enabled, or that you do not have permission to view. If you would like to discuss these sections of your system, you will need to contact your Account Manager who can discuss your options with you. Alternatively, please skip any irrelevant sections of the article and move on to the next step.
Whether you can create, or manage, new users (or user roles) will depend on your user role. If you are unable to perform the below steps, you will need to contact your Account Manager.
- Log in to TalentCentral+™
- In the top right, click on Company settings then Manage users and groups
- Click on Add users
- Here, you can choose to Add individually or Bulk upload your users
- If you Add individually, it is best practice to fill in all the fields, although not all of them are mandatory
- The system will not allow the same Username to be used for multiple users - if you enter a Username that is already in use, you will see an error message asking you to enter a unique username
- At the bottom of the form, you will see an option to add the new user to an existing User group, but this is not mandatory at this stage
- Click to Assign Role
- There are 11 default user roles in TalentCentral+™ - Head HR, Company Admin, Recruiting Manager, Recruiting Lead, Recruiter, Associate, Interviewer, Operations Associate, Invigilator, SHL_Support and Viewer
- Head HR has the highest level of access to the system and therefore should be restricted to only a few individuals to avoid anyone making unagreed changes to the system
- Choose a default Role from the drop-down at the top of the page to view the permissions for that role and click on Save to add them to your user
- You can also choose to Create new role if the default options do not have the combination of permissions that you want for a user
- To Bulk upload your users, download one of the sample files provided (CSV or XLSX) making sure you save the file on the right format
- Take care not to rearrange any of the columns, or headers, of the file as this will impact how the file is uploaded back into the system
- Add a new serial number (S.No.) for each user you add to the file
- Before saving an uploading your completed file, make sure that you have filled in all the required fields, that the Email, Username and Employee ID (if using) fields all contain unique user information and that you have deleted the instructions section of the file
- Click on the Upload CSV/XLSX icon on the system, where you will be prompted to find your completed file for uploading
- Once your users have been uploaded, a pop-up box will appear where you can review the imported information and choose to Cancel or Add users to add them to the end of the list of Users on the system
If you have any questions, please get in touch with your local Technical Support team by clicking on the Contact Form widget on the right side of this page.
]
[
]
Please note, this article may mention sections of the system that you do not have enabled, or that you do not have permission to view. If you would like to discuss these sections of your system, you will need to contact your Account Manager who can discuss your options with you. Alternatively, please skip any irrelevant sections of the article and move on to the next step.
You can only remove a user's access to TalentCentral+™ if you have the Head HR user role. If you do not have that, please contact your Account Manager.
- Log in to TalentCentral+™
- In the top right, click on Company settings then Manage users and groups
- Scroll down to the Users section and find the user - if you have more than 5 users, you may need to use the arrows on the bottom right to scroll through the pages of users to find them
- Click on the user whose access you want to remove and click on Deactivate
- If the deactivated user tries to log in to TalentCentral+™, they will see a Your account is currently inactive message that tells them to contact their TalentCentral+™ administrator if they have any questions
- If you have previously deactivated a user in error, you can Activate them again from this page
If you have any questions, please get in touch with your local Technical Support team by clicking on the Contact Form widget on the right side of this page.
[
Please note, this article may mention sections of the system that you do not have enabled, or that you do not have permission to view. If you would like to discuss these sections of your system, you will need to contact your Account Manager who can discuss your options with you. Alternatively, please skip any irrelevant sections of the article and move on to the next step.
A user's account may become locked if they attempt to log in to TalentCentral+™ multiple times using the wrong login details. You can only unlock a user's account in TalentCentral+™ if you have the Head HR user role. If you do not have that, please contact your Account Manager.
- Log in to TalentCentral+™
- In the top right, click on Company settings then Manage users and groups
- Scroll down to the Users section and find the user - if you have more than 5 users, you may need to use the arrows on the bottom right to scroll through the pages of users to find them
- Click on the user whose account you want to unlock and click on Unlock
- The user can then use the Forgot your password? link on the TalentCentral+™ login screen to set a new password
If you have any questions, please get in touch with your local Technical Support team by clicking on the Contact Form widget on the right side of this page.
]
[
]
Please note, this article may mention sections of the system that you do not have enabled, or that you do not have permission to view. If you would like to discuss these sections of your system, you will need to contact your Account Manager who can discuss your options with you. Alternatively, please skip any irrelevant sections of the article and move on to the next step.
Please note, for the purpose of this article, candidates will be referred to as 'participants'.
- Log in to TalentCentral+™
- In the top left menu, under Projects, click on View all projects
- On the Projects page, you can customise your view of the page by clicking on Manage columns on the right and choosing whether you want to Save configuration for all users
- Check that the drop-down at the top is set to Project then use the Filter and/or search bar at the top of the page to narrow your search
- If you only have participant-specific information to search with, you can change the drop-down to Participant email, Participant Id or SVAR ID, as applicable, then type your information into the search bar, which will bring up any projects that participant is in - Participant Id and SVAR IDs are 14 or 15-digit IDs allocated to a participant once they log in to take an assessment
Locating the results
- Under Actions, click on Participant details next to the right project
- The actions that are available to you on the Participants page will depend on your user role and the status of the participant
- On this page, you can scroll down the list to find your participant(s), or you can use the Filter and/or the search bar at the top of the page to narrow your search
- You can view the Assessment scores on-screen or download the results by ticking the box on the left, next to the name of the participant whose results you want, then clicking on Download PDF reports or Download participant data
- If the report you have chosen on your project is available in more than one language, a pop-up will appear where you can select a Language before clicking on Download reports
- You can bookmark participants by clicking on the ribbon icon on the left next to their name
- Clicking on the three vertical dots under Actions will allow you to perform different actions depending on what stage of the assessment process the participant is in
- For both participants who have not started their assessment(s), and those who have completed them, click on Copy participant link which, when pasted into a new browser tab, will open on the login screen of the assessment site
- Click on Send reminder to trigger a reminder e-mail to any participants who have not completed one, or more, of their assessments, or who are partway through, using an e-mail template of your choosing or using the default Participant deadline reminder - if all assessments have been completed, this option will be greyed out
- For participants who have completed their assessment(s), click on Duplicate participant, which will bring up a pop-up where you can choose to add the participant to the Current Project or Another Project and will allow you to Search assessments to assign to them
- For participants who have completed their assessment(s), click on Download all reports to download their results
- If the report you have chosen on your project is available in more than one language, a pop-up will appear where you can select a Language before clicking on Download reports
- For participants who have not started their assessment(s), or who are partway through, you will have the option to Recall invitation, which will display a This link is not currently valid message to participants when they click on the Start now button in their invitation e-mail or try to proceed through their assessment
- For participants who have not started their assessment(s), you will have the option to Reschedule their assessment(s) by making new selections on the Set deadline page
- To perform actions for more than one participant, select them by clicking on the box on the left, next to their name, then click on the three vertical dots on the Bulk actions banner where you can choose to Bulk reschedule the assessments or Send reminder to all those you have ticked
Below, you will find answers to common problems regarding results.
Can't find my participant using their e-mail address
- Please check that the e-mail address you are searching for is the same as the one used when setting up the assessment or that the participant entered on the application page when taking the assessment
Participant has completed the assessment but their status says 'In progress'
- This usually happens when the participant hasn't submitted the assessment correctly
- This can be because the participant exited the assessment partway through or has violated the proctoring (supervision while the participant takes the assessment)
- The assessment will be automatically submitted, and the status will show as 'Completed' in the next 4 hours
Unable to download the participant results file
- Look for a pop-up blocker on the top right-hand side of the search bar when downloading the data
- Click on the pop-up blocker and click Allow
- The file should then download
Don't know where to check the banding for a participant
- Locate your project then, under Actions, click on the Participant details
- If you do not see the Score band column, you can customise your view of the page by clicking on Manage columns on the right and choosing it from the list
- If the band is not showing, it could be that the participant has not started one, or more, assessments
- You can download the participant results to check this
Can't find a participant's results on the Applicant Tracking System (ATS)
- After the assessment has been submitted, it can take up to 10 minutes for it to register on the system
- If this amount of time has passed, and the participant's results are still not available, it could be that they did not submit an assessment correctly
- It can take up to 4 hours for the assessment to be automatically submitted by the system, after which the results will be available
- If the participant's result still does not appear, please contact Technical Support
If you have any questions, please get in touch with your local Technical Support team by clicking on the Contact Form widget on the right side of this page.
[
Please note, this article may mention sections of the system that you do not have enabled, or that you do not have permission to view. If you would like to discuss these sections of your system, you will need to contact your Account Manager who can discuss your options with you. Alternatively, please skip any irrelevant sections of the article and move on to the next step.
Please note, for the purpose of this article, candidates will be referred to as 'participants'.
Locating your project
- Log in to TalentCentral+™
- In the top left, under Projects, click on View all projects
- On the Projects page, you can customise your view of the page by clicking on Manage columns on the right and choosing whether you want to Save this configuration for all users
- Check that the drop-down at the top is set to Project then use the Filter and/or search bar at the top of the page to narrow your search
- If you only have participant-specific information to search with, you can change the drop-down to Participant email, Participant Id or SVAR ID, as applicable, then type your information into the search bar, which will bring up any projects that participant is in - Participant Id and SVAR IDs are 14 or 15-digit IDs allocated to a participant once they log in to take an assessment
- Under Actions, click on Participant details next to the right project
- The actions that are available to you on the Participants page will depend on your user role and the status of the participant
- On this page, you can scroll down the list to find your participant(s), or you can use the Filter and/or the search bar at the top of the page to narrow your search
Resetting the assessment
- Click on the participant whose assessment(s) you want to reset
- Click on the three vertical dots then Reset workflow
- A pop-up box will appear with a warning that you will reset all assessments and scores for the participant named in the pop-up box
- Click on Reset workflow to reset all the participant's assessments, which will trigger a pop-up message in the top right to confirm that it has been reset
- On the Participants page you will see that all their results have now gone
- Participants will be sent an e-mail to let them know that their assessments have been reset and that they can now attempt them again
If you have any questions, please get in touch with your local Technical Support team by clicking on the Contact Form widget on the right side of this page.
]
[
Please note, this article may mention sections of the system that you do not have enabled, or that you do not have permission to view. If you would like to discuss these sections of your system, you will need to contact your Account Manager who can discuss your options with you. Alternatively, please skip any irrelevant sections of the article and move on to the next step.
Please note, for the purpose of this article, candidates will be referred to as 'participants'.
- Log in to TalentCentral+™
- In the top left menu, click on Communications then Communication templates
- Depending on what has been enabled on your system, or what is available for your region, you may see both an Email and an SMS (for text messages) tab
- Your participants can be sent their assessment links via e-mail. by text message, or both
- Choose your Template type* from the options in the drop-down
- You can choose to Select existing template or Create New to create a customised template
- If you choose to Select existing template, you will need to choose the Template Name* from the options in the drop-down
- If you choose to Create New, you will need to name your template
- At the bottom of the Create New template, you can choose to toggle the User default template to On, which will make the new template the default option for anyone who logs into TalentCentral+™ using the same login details
- Toggle Company default status to On if you want to make the new template the default option for your TalentCentral+™ system, even if different login details are used
- Edit the Subject* and Content* sections to suit your needs
- If you wish to include dynamic fields in your e-mail template, e.g., the participant's Username, you will need to use a % before and after the field name - if you need help with which fields can be added into your e-mail template, you will need to contact your Account Manager
- Click on the Save button to save your changes
- To customise the SMS template, you will need to contact your Account Manager who can discuss your options with you.
If you have any questions, please get in touch with your local Technical Support team by clicking on the Contact Form widget on the right side of this page.
]
[
As part of our continued investment in our products and solutions, SHL are delighted to introduce TalentCentral+™.
TalentCentral+™ gives you access to SHL's latest products and innovations and provides a simpler, more efficient, way to make better talent decisions.
With TalentCentral+™ you get:
- Greater scalability and speed to grow with your business
- Intuitive workflows with simplified journeys for project creation
- Superior recruiter and participant experiences
- Effortless next-level reporting providing real-time insights
If you would like to know more about upgrading to TalentCentral+™, please contact your Account Manager.
]
[
Please note, for the purpose of this article, candidates will be referred to as 'participants'.
- The TalentCentral+™ homepage displays a real-time dashboard that allows you to see all your participant's activities in one place, e.g., who has Not started, Completed or are In progress, etc.
- You can use the Filters at the top of the page to adjust the view, by User, and change the date range by changing the From and To dates before clicking to Apply filters
- The dashboard will continue to update as your participants interact with their assigned assessments
- If you are in another part of the system, and want to return to the dashboard, click on the company logo on the top left of the system
If you have any questions, please get in touch with your local Technical Support team by clicking on the Contact Form widget on the right side of this page.
]
[
Please note, this article may mention sections of the system that you do not have enabled, or that you do not have permission to view. If you would like to access these sections of your system, you will need to contact your Account Manager who can discuss your options with you. Alternatively, please skip any irrelevant sections of the article and move on to the next step.
Please note, for the purpose of this article, candidates will be referred to as 'participants'.
- You will only be able to use an Application form if this has been enabled for your TalentCentral+™ system at a company level - if this section has not been enabled, you will need to contact your Account Manager
- When you create a new project, you will need to complete the Participant experience section where you can choose to use an Application form - if you don't wish to use one, you can toggle OFF this section
- You will have the option to Use existing or Create New
- If you choose to create a new form, you will need to give it a Form name
- Any forms that you create will not only be saved on your existing project, but will appear in the Use existing drop-down list of future projects you set up
- With Create New forms, you can select options from the Field name column that you want to add to your application form by ticking the box on the left
- You can choose to Add custom field and choose how this new field will be shown to your participants, e.g., a Text box, Drop-down, Radio button, etc.
- Untick the Required box next to any fields that you don't want to be mandatory to fill in
- The Application form will be shown to your participants after they have logged in to the system and accepted the Data Protection Notice (DPN)
If you have any questions, please get in touch with your local Technical Support team by clicking on the Contact Form widget on the right side of this page.
]
[
The number of assessments that you can set up on TalentCentral+™ will depend on how you have been set up to pay for using the system. For more information, you will need to contact your Account Manager.
If you have any questions, please get in touch with your local Technical Support team by clicking on the Contact Form widget on the right side of this page.
]
[
For security reasons, you will need to reset your TalentCentral+™ password every 90 days. For the 5 days before the 90-day deadline, if you go to the TalentCentral+™ login screen you will see a Your password will expire message, which will show you how many days before your password expires. It will also provide a reset your password link.
If you do not reset your password before the 90-day deadline expires, the next time you go to log in to TalentCentral+™, you will see a Your Password link has been expired message. You will need to use the Forgot your password? link on the TalentCentral+™ login screen to set a new password.
If you have any questions, please get in touch with your local Technical Support team by clicking on the Contact Form widget on the right side of this page.
]
[
Please note, this article may mention sections of the system that you do not have enabled, or that you do not have permission to view. If you would like to discuss these sections of your system, you will need to contact your Account Manager who can discuss your options with you. Alternatively, please skip any irrelevant sections of the article and move on to the next step.
Please note, for the purpose of this article, candidates will be referred to as 'participants'.
- After the assessment has been submitted, it can take up to 10 minutes for it to register on the system and for the e-mail for the next set of assessments to trigger to the participant
- If this amount of time has passed, and the participant has still not received the e-mail, it could be that they did not submit an assessment correctly
- It can take up to 4 hours for an assessment to be automatically submitted by the system, after which the e-mail for the next set of assessments will trigger to the participant
- If the participant still does not receive the e-mail, or if you have any questions, please contact Technical Support by clicking on the Contact Form widget on the right side of this page
[
]
Below, you will find answers to common problems regarding Smart Interview Live.
Please note, for the purpose of this article, candidates will be referred to as 'participants'.
Microphone isn't working
- Check the status of your device using this link: https://interviews.aspiringminds.com/devicetest?=
- Check your browser Settings to make sure your microphone is connected - typically, this can be found in the Privacy and security section (under Site settings for Google Chrome), but this may differ for different browsers
- Make sure the microphone you are using is selected in the Microphone drop-down
- If you cannot hear your own voice, when you test your device, make sure the microphone volume is turned up to the maximum
- When the browser asks you to Allow the microphone, choose the High-Definition Audio option rather than the default option
- Please note, no other applications should be using your microphone at the same time - if your microphone is in use in another application, it may prevent your browser from accessing it
- Close all other applications then clear your cache and cookies - instructions for how to do this for your browser are best found by doing an Internet search to ensure you get the most up-to-date information
- If you have any questions, please get in touch with your local Technical Support team by clicking on the Contact Form widget on the right side of this page
- If the above does not fix your issue, try another system that has a microphone connected
Webcam isn't working
- Check the status of your device using this link: https://interviews.aspiringminds.com/devicetest?=
- Check your browser Settings to make sure your camera is connected - typically, this can be found in the Privacy and security section (under Site settings for Google Chrome), but this may differ for different browsers
- Make sure the camera you are using is selected in the Camera drop-down
- Please note, no other applications should be using your camera at the same time - if your camera is in use in another application, it may prevent your browser from accessing it
- Close all other applications then clear your cache and cookies - instructions for how to do this for your browser are best found by doing an Internet search to ensure you get the most up-to-date information
- If you have any questions, please get in touch with your local Technical Support team by clicking on the Contact Form widget on the right side of this page
- If the above does not fix your issue, try another system that has a webcam connected
Got logged out of the interview
- Make sure that you are using the latest version of your browser and that you have a stable Internet connection
- Wait 2 minutes then log back into the interview using the same method as when you last logged in
- If you continue to experience issues, we recommend you clear your cache and cookies - instructions for how to do this for your browser are best found by doing an Internet search to ensure you get the most up-to-date information
- If you have any questions, please get in touch with your local Technical Support team by clicking on the Contact Form widget on the right side of this page
Participant didn't join the interview or wants to reschedule
- If you scheduled the interview, you can choose a new time and/or date by locating the interview then clicking on the schedule interview calendar icon and updating the Scheduling details
- Alternatively, you can contact your Account Manager for help
Can't hear/see participant
- Ask the participant to enable their microphone and webcam using the guidance provided in the Microphone isn't working and/or Webcam isn't working sections of this article
- This information can also be found in the Quick Tour on the top right side of the screen
- The participant can click on Device Status to check their device is working
Participant cannot see the questions
- Ask the participant to click on the Q icon on the bottom middle of the screen to bring up the questions
Participant cannot change the system language
- Ask the participant to click on the drop-down on the top right side of the screen to see all available languages
- This information can also be found in the Quick Tour on the top right side of the screen
Participant cannot run the code
- Ask the participant to click on the Run option on the top right of the screen to run the code
Can't find where to add my own questions
- Click on the Q icon on the bottom middle of the screen then Add your own questions - if this is not visible to you then it has not been enabled
- You will need to contact your Account Manager for help
The questions are not correct
- You will need to contact your Account Manager for help
If you have any questions, please get in touch with your local Technical Support team by clicking on the Contact Form widget on the right side of this page.
[
We offer online training to help you get the most out of your TalentCentral+™ system. These training sessions are free of charge and delivered by our experienced system training team. Please click here to register for Live Training.
If you have any questions, please get in touch with your local Technical Support team by clicking on the Contact Form widget on the right side of this page.
]
Please find attached the Release Notes from January 2023 - December 2023.
 SHL Release Notes- 15 Dec 2023.pdf
Please find attached the Release Notes from January 2024 - December 2024.
[
Smart Interview Professional is a structured interview platform integrated with SHL’s TalentCentral+™.
It supports interview guide creation, scheduling, real-time evaluations, and analytics to improve hiring outcomes.
If you have any questions, please get in touch with your local Technical Support team by clicking on the Contact Form widget on the right side of this page.
]
[
Interviewers can provide and update their availability through the Manage Availability page. Here you will have the option to link your work calendar. Interviewers may choose to skip this step and instead manually provide their availability.
To access the “Manage Availability” page:
1. Click on your user profile button on the top right navigation bar to open the drop-down menu
2. Click “Manage Availability”
1. Click on your user profile button on the top right navigation bar to open the drop-down menu
2. Click “Manage Availability”
If the “Manage Availability” option is not available, reach out to your administrator to enable this feature.
If you have any questions, please get in touch with your local Technical Support team by clicking on the Contact Form widget on the right side of this page.
]
[
An interviewer can provide access to other users in their organisation so that they can manage the interviewer’s calendar on their behalf. This includes the ability to:
- Update general working hours
- Update timeslots for unsynchronised accounts
To allow another user to access the calendar:
- Scroll to bottom of “Manage Availability” page
- Select “Allow recruiters with appropriate permissions to view and manage your calendar”
- Click the “Select user” dropdown
- Select users to share calendar availability
If you have any questions, please get in touch with your local Technical Support team by clicking on the Contact Form widget on the right side of this page.
]
[
To start the interview:
When an interview is scheduled, interviewers will receive an emailed invitation containing details related to the interview. This includes the date, duration, candidate, role, and format of the interview, as well as the joining link and instructions.
To join an interview:
- Click the “join now” button in the invitation email to enter the interview onboarding interface.
On this screen, interviewers will see the role, candidate name, and instructions for the interview. On the navigation bar, interviewers may preview the Candidate panel, Questions and Scorecard.
To start the interview:
- Click “Enter interview room”
To close the Interview interface, interviewers may close the window.
To re-open, interviewers may click the “join now” button in the invitation email at any point until interview has concluded.
Note: this page will not be accessible once the interview has started.
If you have any questions, please get in touch with your local Technical Support team by clicking on the Contact Form widget on the right side of this page.
]
[
Clicking on any of the button will open the section in a panel to the right. Once the candidate and interviewer enter the interview room, the interviewer will be able to rate questions and add notes using the Questions panel, add add overall feedback in the scorecard section.
Yes, Smart Interview Professional includes a built-in video interview platform with many of the same features (live captions, screen sharing, chat, whiteboard) you'd expect from tools like Microsoft Teams or Zoom.
The following items are available to the interviewer on the navigation bar in the interview room:
- Candidate
- Questions
- Scorecard
- Notes
- People
- Chat
- Whiteboard*
- Live Captions*
- Start/Stop Camera
- Mute/Unmute Mic
- Share Screen
*Indicates panel may or not be available due to company’s settings.
Clicking on any of the button will open the section in a panel to the right. Once the candidate and interviewer enter the interview room, the interviewer will be able to rate questions and add notes using the Questions panel, add add overall feedback in the scorecard section.
If you have any questions, please get in touch with your local Technical Support team by clicking on the Contact Form widget on the right side of this page.
]
[
Note: The free response section is a separate field from question notes. Question notes are not visible in the scorecard.
To score a candidate's response, use the Questions panel to rate responses and the Scorecard panel to provide overall feedback and a recommendation.
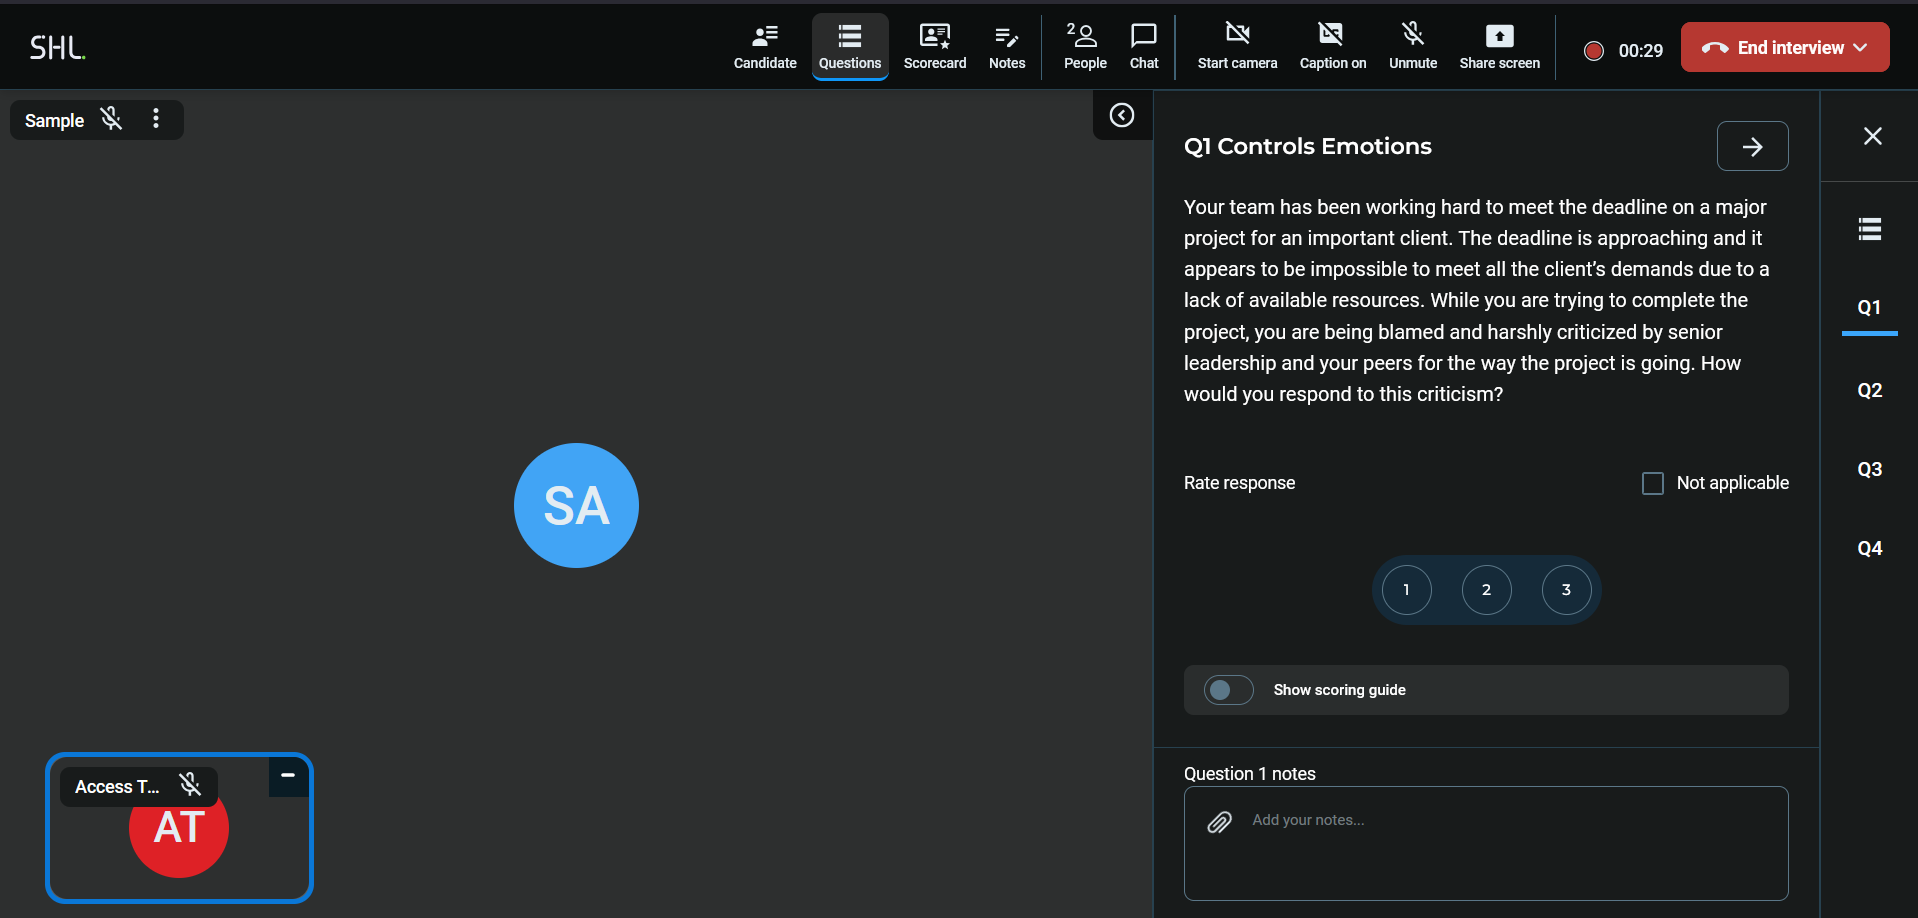
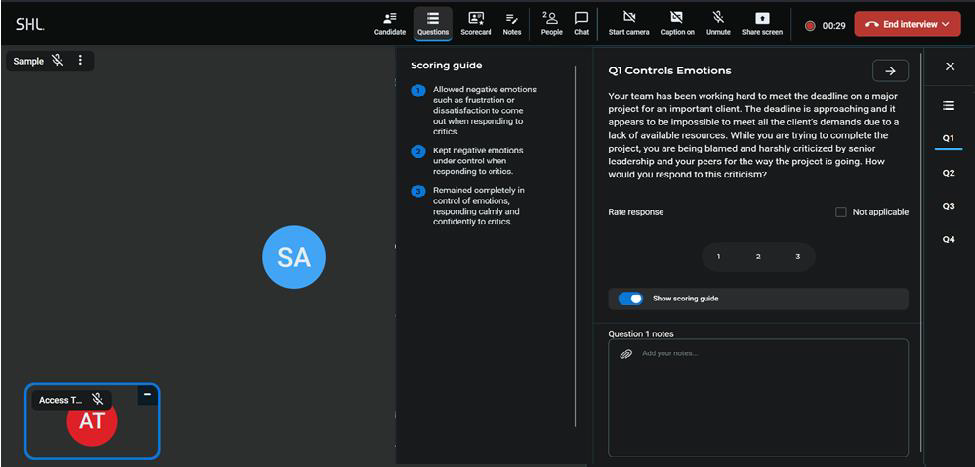
During the interview, the interviewer would be asking the questions from the ones present under the Questions section.
Every question is comprised of a Question statement, Question Ratings, Scoring Guide and Question Notes.
- Question statements are questions or prompts that are used by interviewers to score candidates based on desired topics and behaviors. The questions are configured by recruiters and hiring managers in TalentCentral+™ Interview Guide Builder tool
- Note that sometimes the question statement may not be intended to be read out-loud to candidates. Because of this, we advise all interviewers to familiarise themselves with interview questions by viewing the interview guide before the interview.
- Question ratings Interviewers may rate responses to the question statement using the provided rating scale or free-response text field. Question ratings will save automatically but can be modified until the interview concludes and the interviewer submits their recommendation. Data from question ratings will be compiled to be visible on the scorecard panel in real-time.
Free response ratings will be saved automatically but may be modified until the recommendation is submitted.
Note: The free response section is a separate field from question notes. Question notes are not visible in the scorecard.
Completing question notes will not mark a free response question complete.
- Questions may be marked as “Not Applicable” if ratings are not required
- Rated questions will appear with a check mark in the question navigation bar
- Show Scoring guide will open a sub-menu showing the defined rubrics for the question rating. Interviewers can refer to the scoring guide to rate candidate responses effectively.
- Question Notes is a free-form text area where interviewers can add notes on the candidate or candidate’s response to each question. Notes are automatically saved. Notes on the question level will not be visible in the scorecard but may be accessed in the video playback on TalentCentral+ if applicable. Attachments can be added to notes.
Scored questions will be marked with a green checkmark on the question navigation.
If you have any questions, please get in touch with your local Technical Support team by clicking on the Contact Form widget on the right side of this page.
]
[
If an interviewer or candidate leaves the interview player during the scheduled interview time slot, they may re-enter the interview room using their original invitation link.
Users may need to progress through the login and interview onboarding pages before re-entering the interview room.
If you have any questions, please get in touch with your local Technical Support team by clicking on the Contact Form widget on the right side of this page.
]
[
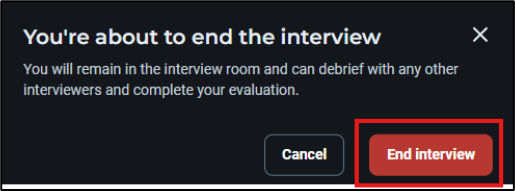
4. Click “End interview” on the pop-up that appears to end the interview. To cancel this action,
click “cancel.”
To end the interview, please follow the below steps:
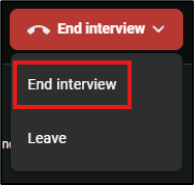
1. Click “End interview” button in the navigation bar 
2. Select “End interview” from the dropdown
3. Note: Selecting “Leave” will allow individual user to leave the interview room, however this will not end the interview for other interviewers and candidate.
4. Click “End interview” on the pop-up that appears to end the interview. To cancel this action,
click “cancel.”
Upon ending the interview, the candidate will be removed from the interview room, but all interviewers will remain in the interview player. Interviewers may conduct a wash-up, score, write notes, and submit recommendations during this time.
Note: Scores will not appear on the TalentCentral+™ system until the interview is ended, all recommendations have been submitted, and all interviewers have left the interview room.
If you have any questions, please get in touch with your local Technical Support team by clicking on the Contact Form widget on the right side of this page.
]
[ ]
No, currently video backgrounds cannot be changed
If you have any questions, please get in touch with your local Technical Support team by clicking on the Contact Form widget on the right side of this page.
[
For example, if general working hours are set as Monday 9 am to 5 pm, the platform will assume time before 9 am and after 5 pm is unavailable. Within 9 am to 5 pm, the system will check for availability from the synced calendar.
To set up working hours, please follow the below steps:
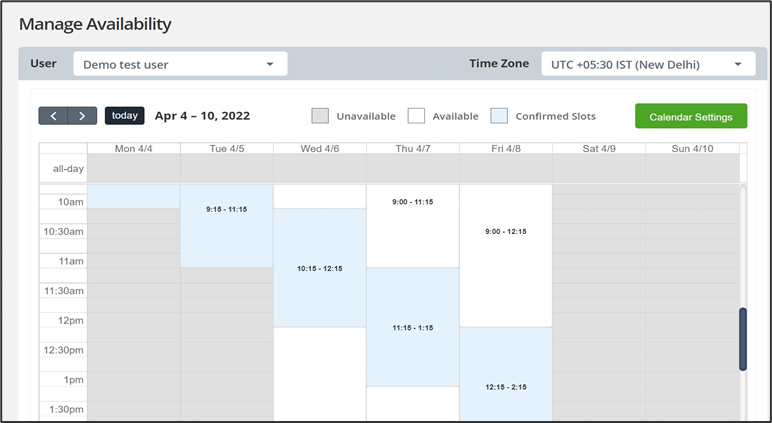

Interviewers may also add their general working hours to their calendar settings. The availability of the interviewer will be a combination of general working hours and calendar sync. Additionally, interviewers may mark free or busy slots using the interactive calendar on the “Manage Availability” page.
For example, if general working hours are set as Monday 9 am to 5 pm, the platform will assume time before 9 am and after 5 pm is unavailable. Within 9 am to 5 pm, the system will check for availability from the synced calendar.
To set up working hours, please follow the below steps:
1. From the profile menu, go to “Manage Availability” and click “Calendar Settings”
2. Click the “Set your working hours” tab
3. Select the check mark button  for days that you are available
4. Use drop-down menus to select time ranges where you are available
5. Additional time ranges for days may be added using the “+” button
5. Click “Save” to save working hours
If you have any questions, please get in touch with your local Technical Support team by clicking on the Contact Form widget on the right side of this page.
]
[
Use the Questions panel to rate responses and the Scorecard panel to provide overall feedback and a recommendation.
During the interview, the interviewer would be asking the questions from the ones present under the Questions section. Every question is comprised of Question statement, Question ratings, Scoring guide, Question Notes.
- Question statements are questions or prompts that are used by interviewers to score candidates based on desired topics and behaviors. The questions are configured by recruiters and hiring managers in TalentCentral+ Interview Guide Builder tool.
- Note that sometimes the question statement may not be intended to be read out-loud to candidates. Because of this, we advise all interviewers to familiarise themselves with interview questions by viewing the interview guide before the interview.
- Question ratings Interviewers may rate responses to the question statement using the provided rating scale or free-response text field. Question ratings will save automatically but can be modified until the interview concludes and the interviewer submits their recommendation. Data from question ratings will be compiled to be visible on the scorecard panel in real-time.
- Free response ratings will be saved automatically but may be modified until the recommendation is submitted.
- Note that the free response section is a separate field from question notes. Question notes are not visible in the scorecard. Completing question notes will not mark a free response question complete.
- Questions may be marked as “Not Applicable” if ratings are not required
- Rated questions will appear with a check mark in the question navigation bar
- Show Scoring guide will open a sub-menu showing the defined rubrics for the question rating. Interviewers can refer to the scoring guide to rate candidate responses effectively.
- Question Notes is a free-form text area where interviewers can add notes on the candidate or candidate’s response to each question. Notes are automatically saved. Notes on the question level will not be visible in the scorecard but may be accessed in the video playback on TalentCentral+ if applicable. Attachments can be added to notes.
Scored questions will be marked with a green checkmark on the question navigation.
Scoring guide (open)
If you have any questions, please get in touch with your local Technical Support team by clicking on the Contact Form widget on the right side of this page.
]
[
To access the interview playback from the participant list, please follow the below steps:
4. The interview playback may take several minutes to appear after the interview has ended
The interview playback is a recording of the interview.
To access the interview playback from the participant list, please follow the below steps:
1. Click the action menu icon next to a completed interview and select the playback button 
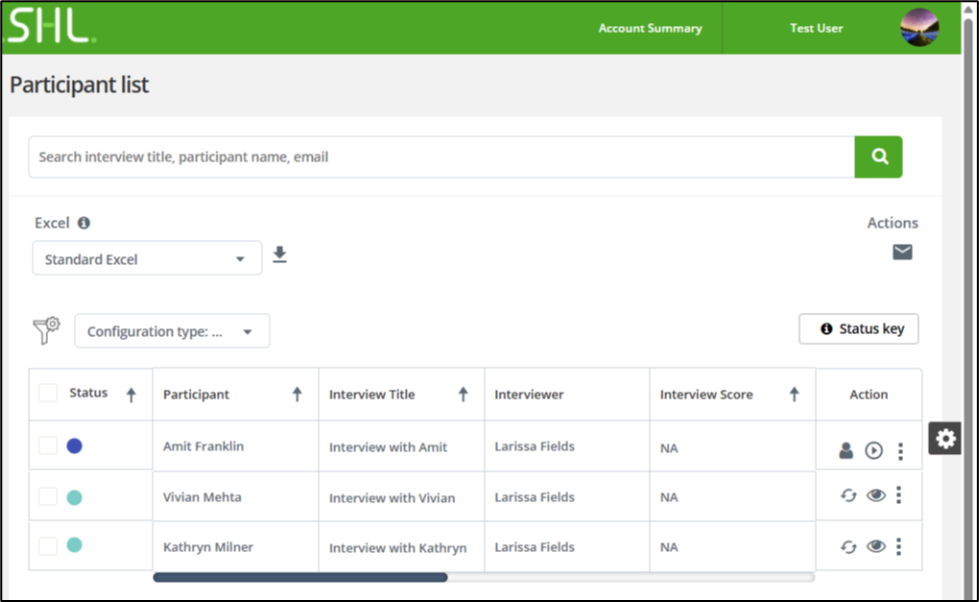
2. Selecting the playback button will open the interview playback in a new tab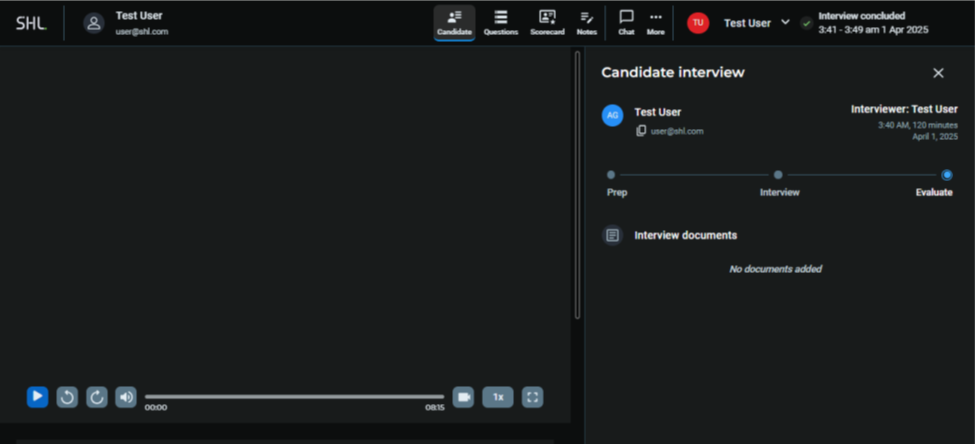
3. In addition to viewing the recording, the playback allows for interviewers to view questions, rate, and submit their recommendation after an interview has ended
4. The interview playback may take several minutes to appear after the interview has ended
If you have any questions, please get in touch with your local Technical Support team by clicking on the Contact Form widget on the right side of this page.
]
[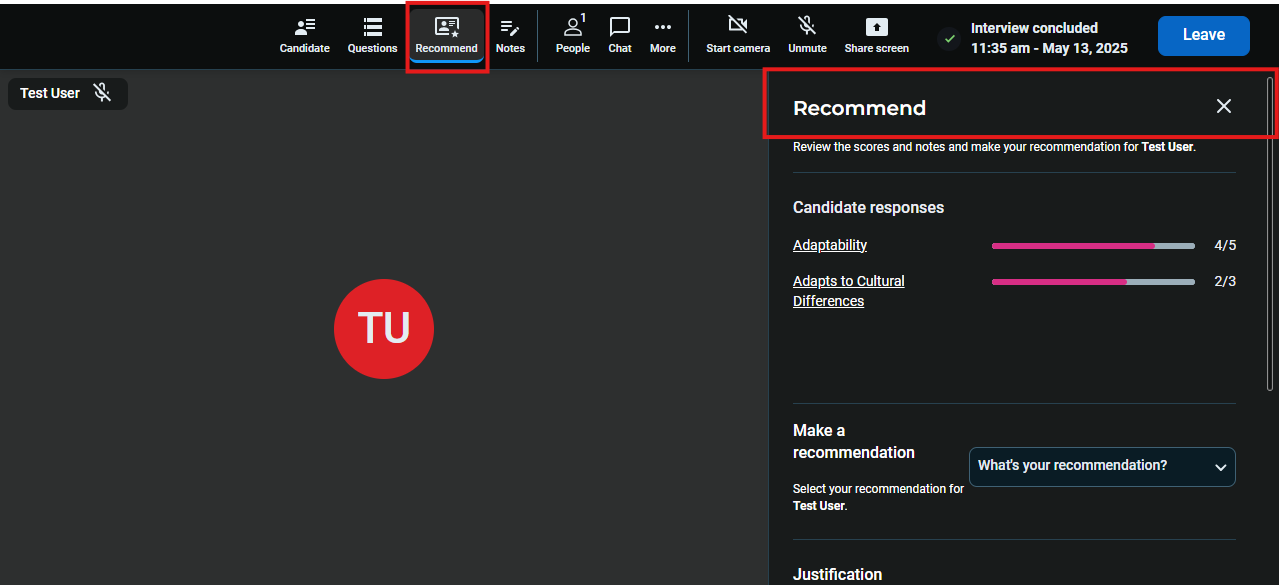
To recommend a candidate, please follow the below steps:
- Click “Recommend” on the navigation to open the recommendation panel. Interviewers may select their recommendation in the scorecard panel when interview is ended, and all questions have been scored or marked as “not applicable.”
Note: Recommendations cannot be selected until all questions are scored.
The recommendation is unique to each interviewer and appears in the candidate scorecard after the interview.
- Interviewers must choose the recommendation status in each interview
- Recommendations will not be auto selected
The default recommendations for Smart Interview Professional are:
- Progress candidate: candidate has performed well and can progress to next round.
- May require further assessment: candidate may need to be assessed more before deciding if they will progress to the next round.
- Do not progress candidate: candidate has not met qualifications and should not progress to next round.
- Justification is a free-text response area where interviewers can share the reasoning for theirrecommendation. This will be visible to recruiters and hiring managers on the candidate scorecard after the interview.
If you have any questions, please get in touch with your local Technical Support team by clicking on the Contact Form widget on the right side of this page.
]
[
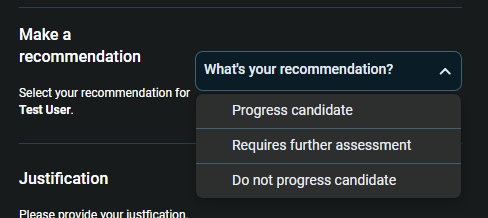
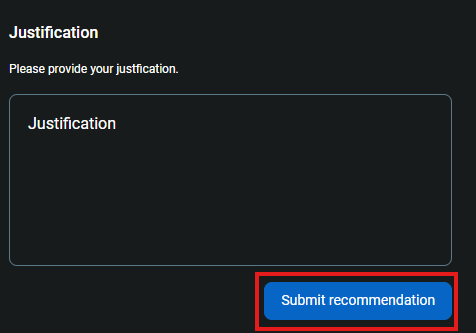
To submit a recommendation from the recommendation panel:
1. Scroll to the “Make a recommendation” section
2. Use the dropdown to select recommendation
3. Type justification, if applicable, in the free text section
4. Click 'Submit recommendation' to finalise the recommendation
5. To update your recommendation, select your updated recommendation from the 'Make a recommendation' dropdown, and click 'Submit recommendation' to update.
]
[
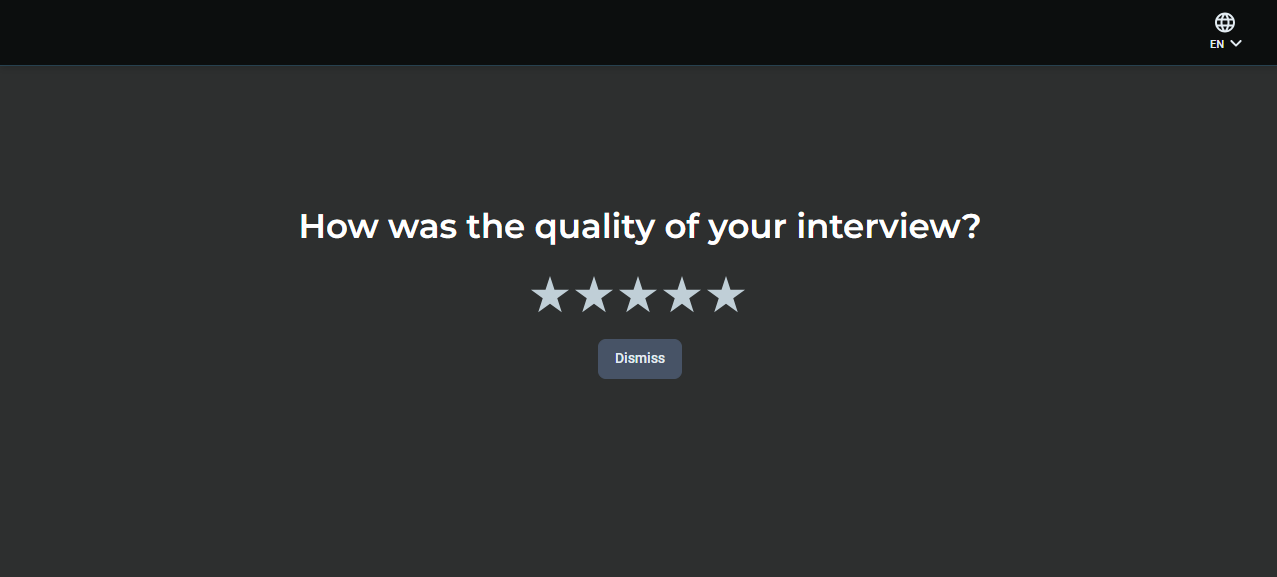
After leaving the interview room, interviewers may rate their interview experience. This rating may be shared with the hiring team and SHL for future improvements.
If you have any questions, please get in touch with your local Technical Support team by clicking on the Contact Form widget on the right side of this page.
]
[
To view, reschedule or cancel an interview, the click on “Your Interviews” under “Interviews” menu item from the left-hand navigation menu.
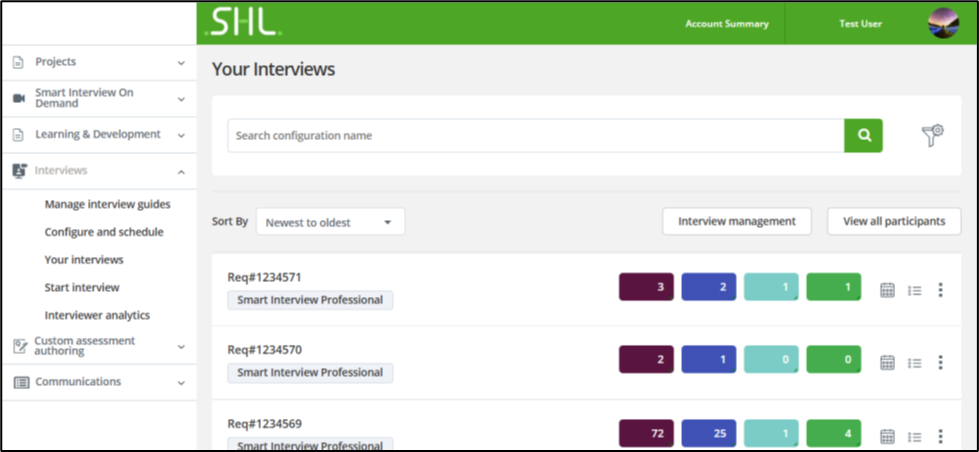
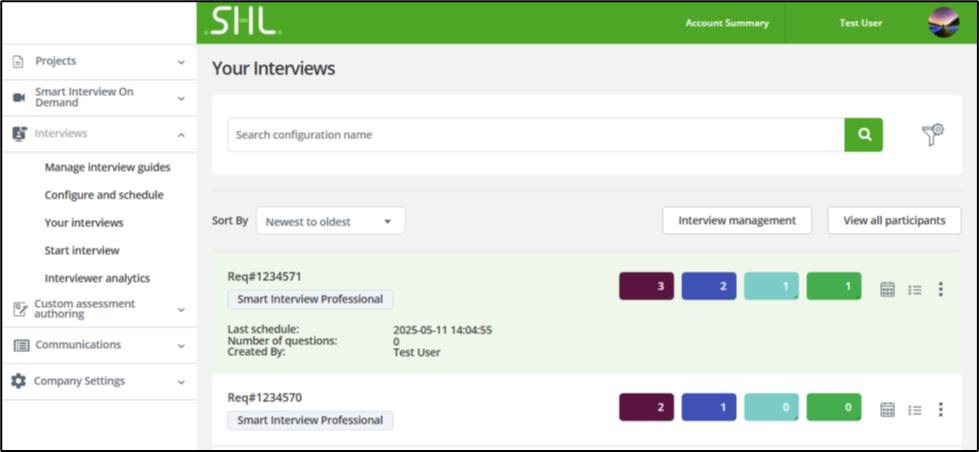
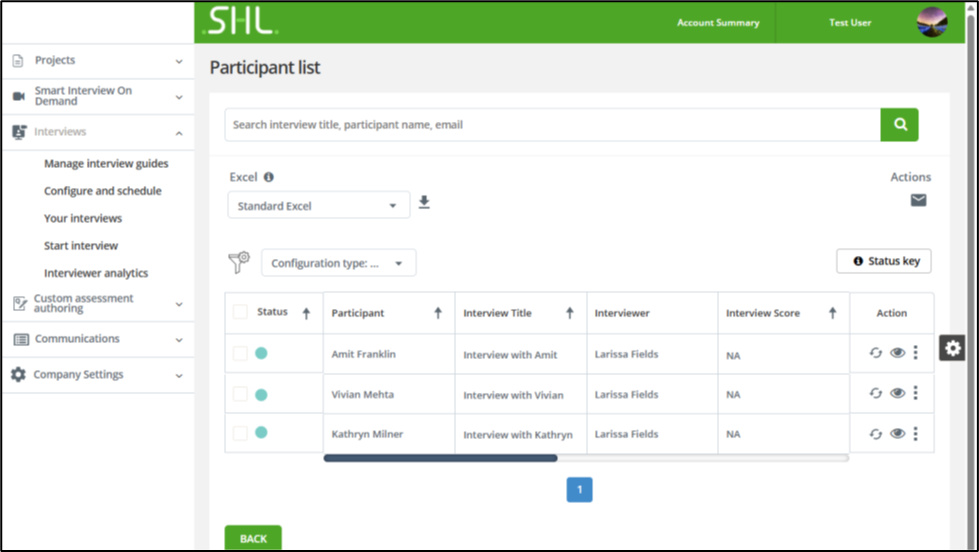
Once an interview is scheduled, the recruiter can either reschedule or cancel the interview from
TalentCentral+™.
TalentCentral+™.
To view, reschedule or cancel an interview, the click on “Your Interviews” under “Interviews” menu item from the left-hand navigation menu.
Select the Role or Interview Guide for which you want to reschedule or cancel the interview and click on the 'Scheduled' icon as shown.
3. Scheduled interviews for the chosen role or interview guide will be displayed.
If you have any questions, please get in touch with your local Technical Support team by clicking on the Contact Form widget on the right side of this page.
]
[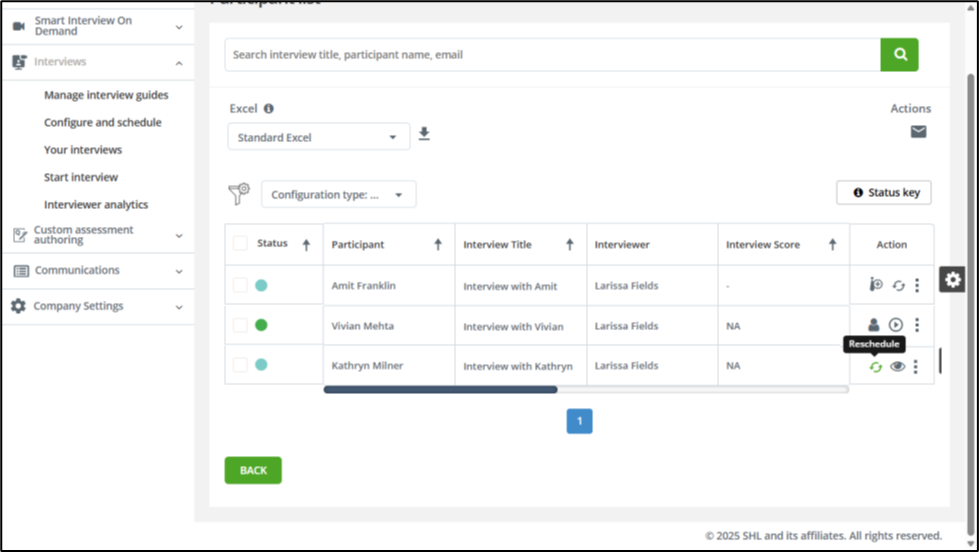
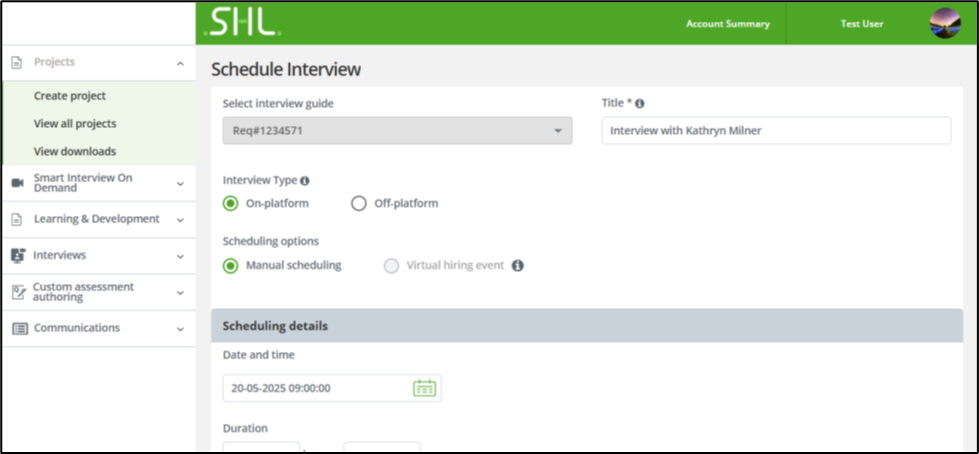
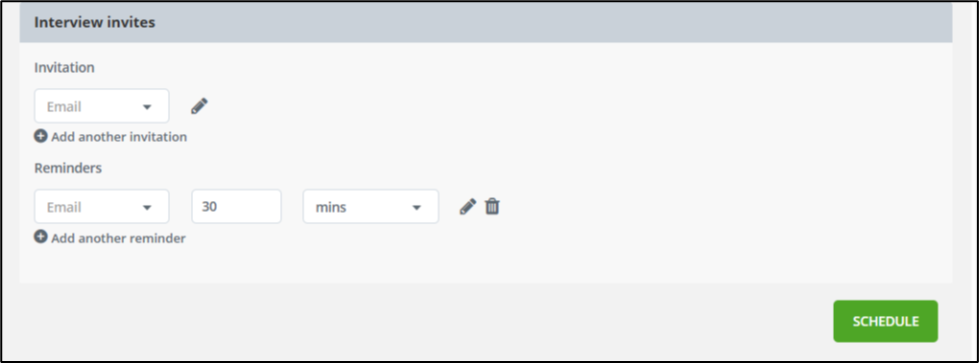
To reschedule an interview, please follow the below steps:
1. From the participant list, click on the Reschedule icon  for the candidate for whom you want to reschedule the interview.
2. “Schedule Interview” Page will open. Input all required details.
3. Click “Schedule” to reschedule the interview.
Note: Recruiters may use the reschedule function to change scheduled time, duration, scheduling type, or interview type. Interviews that have expired past the scheduled time will not be able to be rescheduled.
If you have any questions, please get in touch with your local Technical Support team by clicking on the Contact Form widget on the right side of this page.
]
[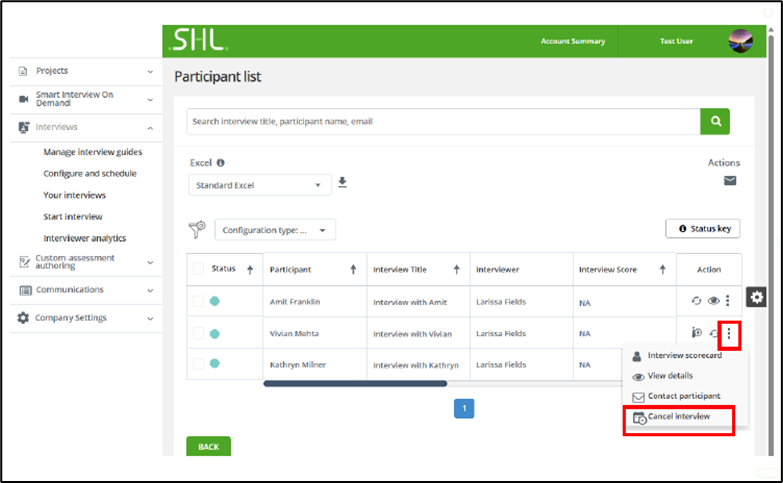
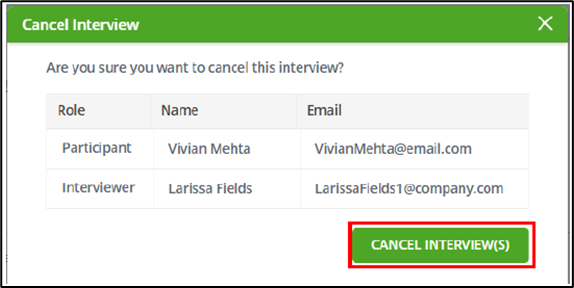
Please follow the below steps to cancel an interview:
1. From the participant list, select the 'action menu'  icon on the extreme right of the participant row and click on the 'Cancel Interview' Option
2. Confirm participant and interviewer and click 'Cancel Interview(s)' to cancel the interview.
If you have any questions, please get in touch with your local Technical Support team by clicking on the Contact Form widget on the right side of this page.
]
![$Label["Widget.Alt_ContactForm"]](./assets/img/outline_contact_page_black_24dp.png)

